Showing posts with label tutorial. Show all posts

Sunday, August 12, 2012

Fixing a Broken Thread on a Woven Wrap - Photo Tutorial!

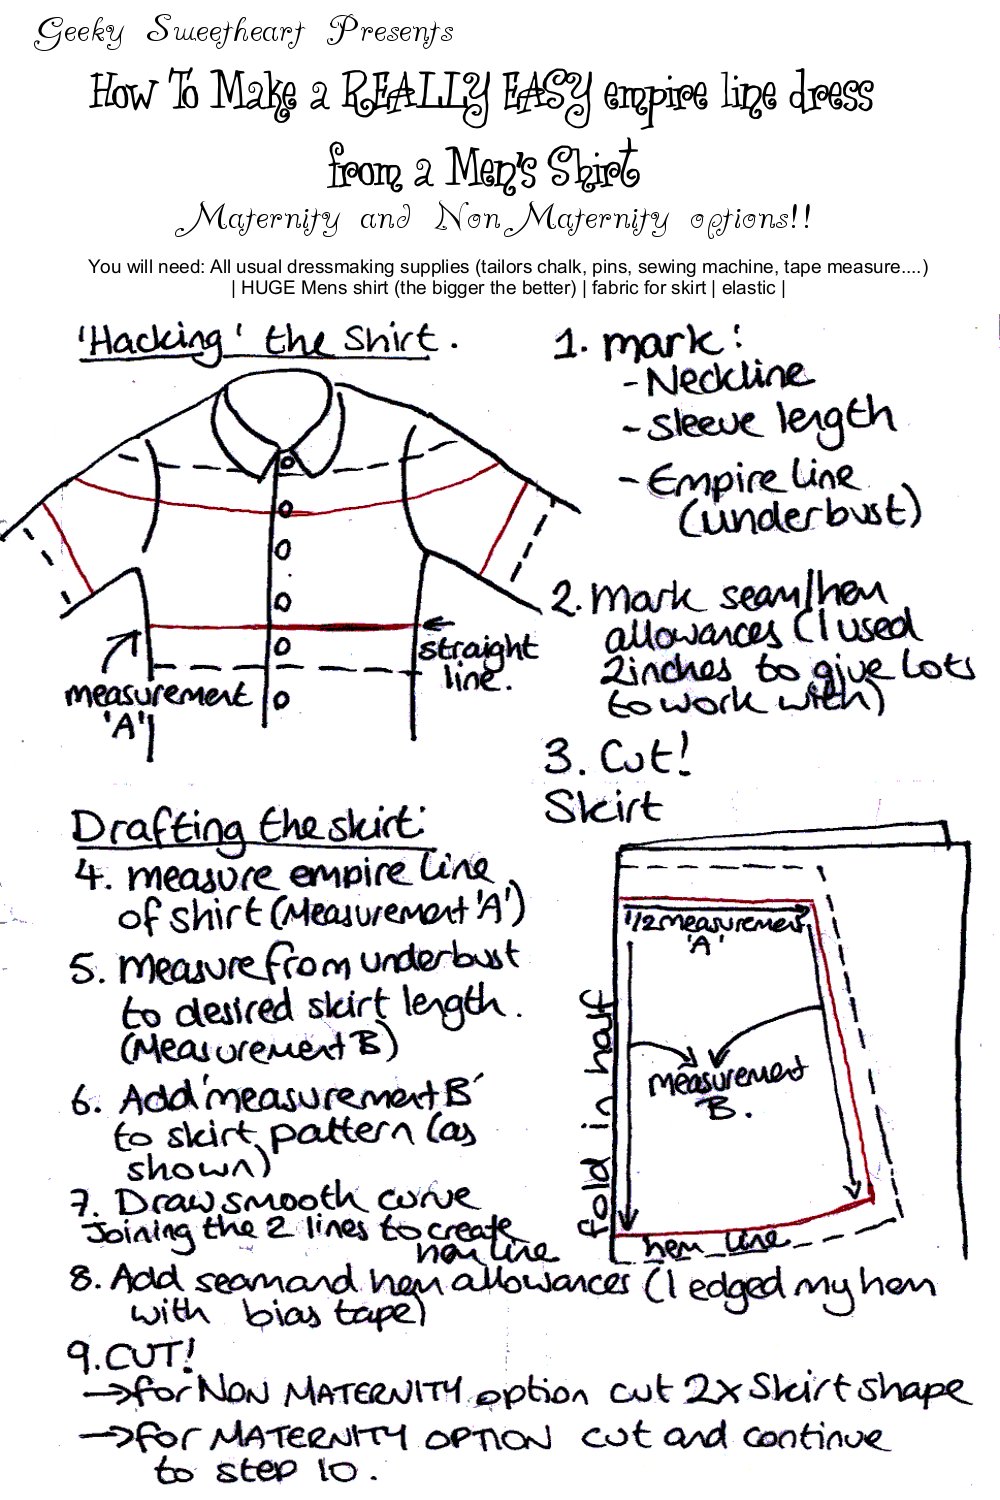
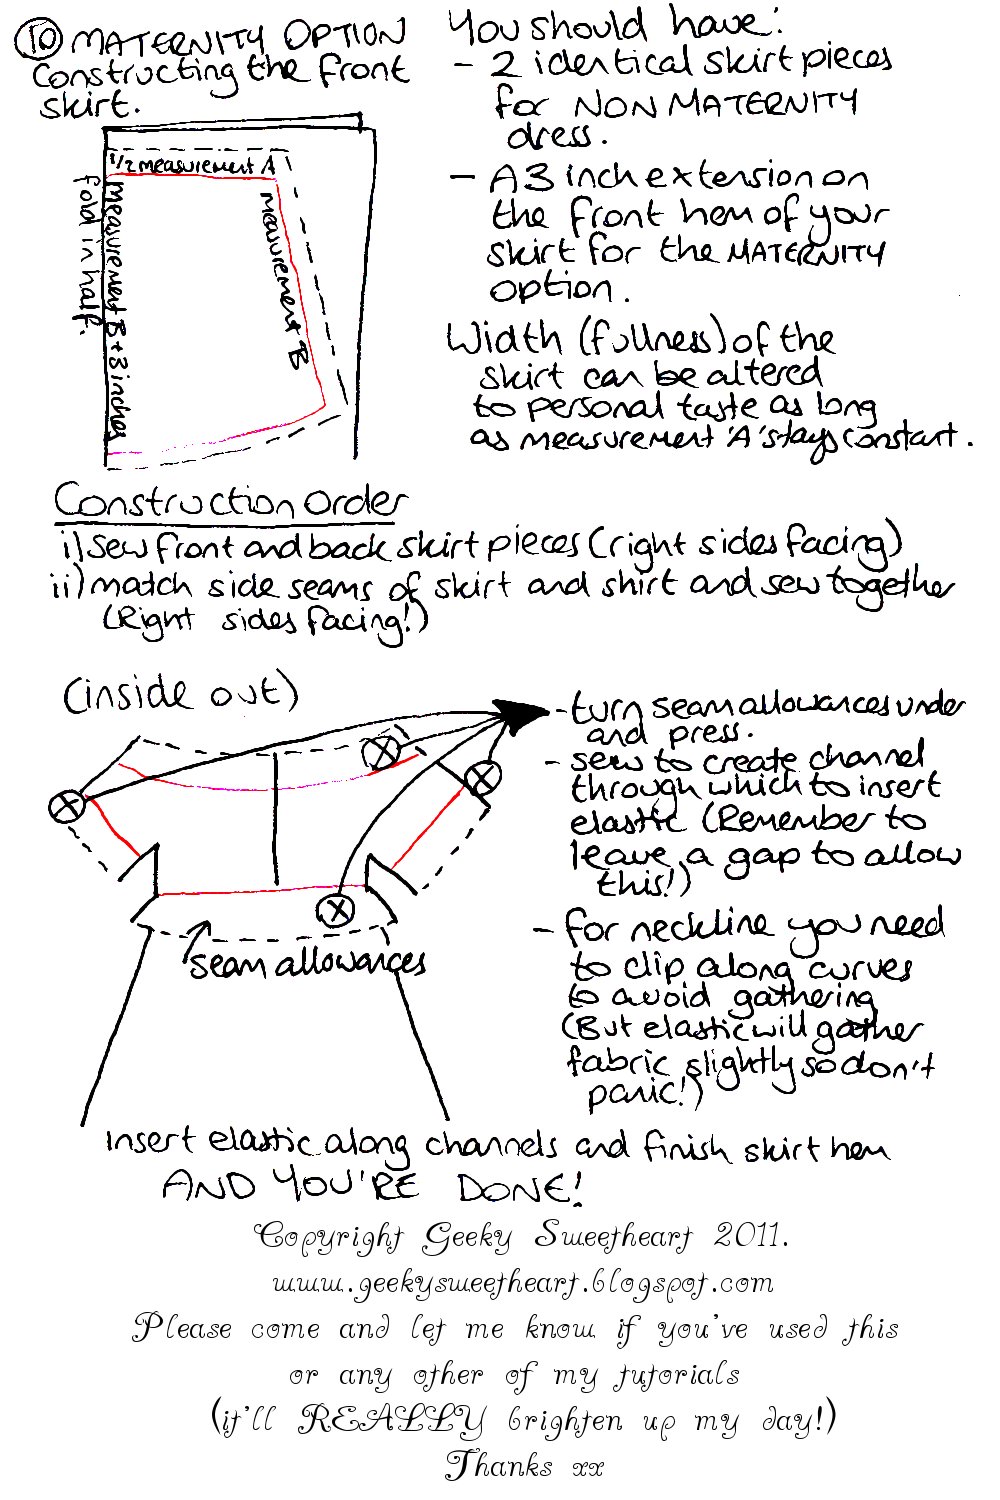
A woven wrap is a long length of material with a loose weave, this enables the fabric to keep it's strength and shape while having a good amount of 'give' along the bias (diagonal). These qualities make the fabric ideal for carrying a baby, allowing mama and bubbah hours of comfortable walking/playing/shopping :-D


... sleeping... 

The downside of this loose weave is that individual threads can become snagged on clothing, car doors, velcro... and be pulled out of the weave, causing a nasty little loop to form on the surface of the fabric. In the most extreme incidences these threads can snap ad become broken, or can even form a hole :-( A broken thread is, unfortunately a hole waiting to happen. Once a hole forms in fabric it's much more liable to a tear... so for many people a broken thread is the death if a wrap... because they can't trust a 'hole waiting to happen' to carry their baby... fair enough! ... but they can be fixed :-) fixed broken threads are not always pretty, but they are safe if done correctly :-)

Sunday, July 29, 2012

Tutorial and Pattern: Wrap Strap Bag!

Ok :-) the tutorial and my first ever printable PDF pattern is HERE!!


Happy making!! I cant wait to see what you guys do!!

Edit 3pm 29/07 ... ok I just realised long time readers of this blog may not 'get' this bag, lol, it had wraparound straps which make it easier to use when you're carrying a baby in a sling.  And if you're carrying your baby on your front you can thread the straps through the side loops and tie together at the bottom to wear as a backpack!

the idea is not unique to this bag, but this bag is constructed very differently to other babywearing bags, with a view to making it easier for people to DIY at home :-)

EDIT 7/8/12
The eagle eyed among you will notice that this bag has side loops similar to the popular Onbag. If you've ever attempted to make an Onbag you will be able to see that the construction of this bag is entirely different.

Advantages of this bag/tutorial over the Onbag/tutorial

  • This bag has separate straps 'pieces' this means that the whole bag can be made out of 1 metre outer and 1 - 1-1 1/4 metre of lining fabric - this is substantially less than Onbag which requires you to make the strap, bag base and body out of a 3.5m length). 
  • This bag comes with a full printable PDF pattern. This will help you ensure you cut exactly the right shapes to construct your bag. It will also make the bag easier to make for experienced sewists who are used to using paper patterns.
  • This bag comes with a full printable PDF photo tutorial. There's also a full collection 65 of work-in-progress pics over at my flickr to guide you through every step of the way.
  • This bag comes with a zip closure as standard. Fully explained in the tutorial, no meed to worry about sewing it, or keeping your belongings secure when out and about!
  • This bag is designed for DIY'ers. All you need to put this together is a sewing machine that does a regular straight stitch and a zipper foot. No endless rolled hems, promise!


Finished: Wrap Strap Bag

I got a bit excited about this one and forgot to actually post it on the blog... whoops!

If you're not on my facebook page you should be! You'd know ALL about this if you did!

Ok so, if you dont carry your baby in a sling this one'll have really passed you by, but the 'nappy bag' situation is a real problem for slingy mamas! so here's a bag with straps that tie around you and your baby, and it can also be converted to a backpack for when you're carrying your little one on your front :-)

Friday, June 01, 2012

Folkclore Crafts - Blog Book Tour!!!


Declaration of vested interest: I'm IN these freaking BOOKS!!!
I'm a CRAFT AUTHOR!!!
So please understand that this post is completely and utterly biased! :D

Buy the books here

 
Welcome to any readers coming over from http://kathleendames.blogspot.co.uk/ ... pull up a chair! make yourself comfortable!

 
I'm so excited guys! I've got a project in each of these books, the debut publications from fabulous publishing.
And read further for a chance to win Folklore Crafts Matryoshka!

Tuesday, October 25, 2011

How to: Baby Carrier!

So many unfinished stories, here's one I've been meaning to get to for AGES!

I told you a while ago that I was making my own SPOC (simple piece of cloth) baby carrier. They're also often referred to as baby wraps or slings, and they're often HELLA-expensive!

Witness the awesomeness that is babywearing - I've just noticed my hand seems to be supporting Squiggle's bum here - that's completely unnecessary, he's nice and snug in there... in fact after I took this picture I went shopping (about half a mile walk there and half a mile back) Squiggle had a nap in the sling (not uncommon - it's so relaxing for him!) it rained cats and dogs, but I just popped up my umbrella while other mothers were ducking for cover trying to figure out how to attach their rain cover to their buggy . . . Meanwhile Squiggle carried on with his nap. . .

I'm kind of embarrassed to even call this a sewing project it really is as simple as buying a piece of fabric and hemming it... no really!

Thursday, September 22, 2011

It's ME!!... well ... not really...

I finally got around to padding my dressform to make it something like the right shape....

Friday, August 05, 2011

Breastfeeding Pillow - Tutorial

(psst, don't forget to enter my AWESOME giveaway)

 it's essentially a U  shaped bean bag... I got a 1.5 cubic foot Beanbag top-up bag for £3.50 at QD (which is similar to Wilkinson's if you don't have one near you) google it and the Internet will furnish you with suppliers, but because it's a bulky thing it's better to look in craft shops/furniture shops to see if you can pick it up locally and avoid the P+P charges


Wednesday, July 27, 2011

Crinkle Taggie Baby Soother - Tutorial

ok then, remember these noisy toys?


In a previous post I showed you how to insert the jingle bells into the taggie plush :-) Now I'm going to show you how to make the Crinkle Taggie Soother.


The Internet has told me that babies love things that crinkle, and things with ribbon loops/tags, and this is my response! err... unfortunately I have no way of verifying this information at this point since my lazy baby still isn't here! and even when (s)he does arrive, I hear tell that they don't do much except cry, sleep, feed and wee for the first few days.

Anyhow, click here for the printable -step by step tutorial - for how to make a Crinkle Taggie Baby Soother!!

Click the read more link to see some work in progress pics and take a quick tour of the construction process:

Wednesday, July 20, 2011

Tutorial! How to make a Jingle Bell Plush!

So guys, I've made a couple of noisy baby toys for a friend. A jingle bell plush and a crinkly taggie 'blanket'.
Today I'm going to show you how to make the plush, The 'blanket' coming later in the week.

Here's a video of them 'live' so to speak - obviously you'll need your speakers on to fully enjoy the noisiness of them :-)


Here's the tutorial for the plush itself. (as you can see.. not my work)
And here's the extra tutorial (mine) for adding in the jingle bells.

And here's some more pics of the plush!! <3! (after the 'read more' link)

Friday, July 15, 2011

PM: Upcycle a Mens shirt into an Empire Line Dress. TUTORIAL


Now I know it's traditional to post the tutorial after I show you the finished project - but I'm not up for having pictures took of me and my big fat swollen feet at the moment :-)

so here's my first illustrated tutorial!!

This dress is great for many reasons
(1) you can make it as a maternity or a non-maternity dress
(2) you can make it as a maternity dress and then with a quick em adjustment, you can still wear it once your body has shrunk back down to normal proportions ^.^
(3) it doubles up as a nursing dress because it's button up
(4) it's elasticated so you don't have to worry too much about sizing
(5) its SUPER easy!!!

it's ALLL good baby!

EDIT: I dont know what the hell Picasa has done to my pictures to make them so blocky- BUT I've converted these imaged into a PDF that you can download and print. download it here

Friday, June 10, 2011

Maternity 'Pirate' Top - Mens shirt upcycle - Tutorial


OK,  as promised a TUTORIAL for my men's shirt upcycle :-) I've made this as a maternity piece but it could of course suit the un-pregnant ladies out there who are best served by an empire line for whatever reason...

Friday, June 03, 2011

Zippered Cuff Purse (With TUTORIAL!)

I'm spoiling you guys this week...

Today let's make one of these!!

(photo credit - Craftster User Azura)

What we have here is a fashion accessory with a secret! A cuff with a secret zip compartment for for keeping your money (for MONEY people!) safe when you're out moshing :-)

I'll walk you through drafting your own pattern to fit your own wrist or you can download my pattern (my wrist circumference is 6 inches)

(right click, save image as)


Thursday, June 02, 2011

Teddy Bear Labcoat (With TUTORIAL) !!

Check out this cutey pie!


A few months ago a good friend of mine dropped me a facebook message asking if I'd be able to make a labcoat for his girlfriend's teddy bear as a birthday present. . . I thought, "yea, why not! there must be loads of tutorials on the Internet for stuff like that..." ... well guess what... there isn't :-/ ...

Well there is now!!
Teddy Bear Labcoat Tutorial!!

This pattern should fit teddys of these proportions. 
Some modification might me needed for smaller/larger teddies!
arm circumference 12 cm
neck 26 cm
under arm circumference 28 cm
waist 34 cm
neck to foot 22 cm
neck to top of leg 14 cm
arm length 12.5 cm

Pattern Pieces: right click and "Save Target as"/"Save image as"
I haven't figured out the whole PDF thing yet, so I've included a tape measure on each one so you can be sure you've got the sizes right for printing.


Friday, May 20, 2011

Craft Swaps: OTT Star Wars Swap - Sent - Embroidery Case Tutorial!!

So! I sent this for the Star Wars OTT swap:


 (Death Star for illustration purposes only :-) )

I liked it so much I made myself one too!!


The pieces you will need are as follows:
OUTER:
2x circles (interfaced) - I used a side plate with a 8 1/4 inch diameter
2x long side pieces (1.5x28 inches)
2x short side pieces (5 1/2x3 3/4 inches)
LONG zip, doesn't matter too much how long as long as it goes most of the way around your circle.

LINING:
2x circles (with or without interfacing depending on quality of fabric. I did mine without.) - same size as outer.
2x long side pieces (1.5x28 inches)
2x short side pieces (5 1/2x3 3/4 inches)
Pocket piece - semi circle same size as other circular pieces with around 1 inch added to straight side for hemming.
Wrist strap (3x12 inches)
3 Needlebook pieces (5x4 inches) (5x6 inches) and (5x8 inches)


My Embellishments:
My labels and my Star Wars decal were made by interfacing fabric and then using iron on ink jet transfer paper to transfer the design, REALLY easy to do, and the possibilities are endless for you to customise this up any way you like.

EDIT: the image is from Deviant Art user Jasonpal - you should check out his gallery, it's great work! the speech bubbles were ALL my idea :-)

The Method:


Please let me know if you've used my tutorial, I'd love to see what other people have made using this design <3!!

x G

Tuesday, May 17, 2011

Tuesday, May 10, 2011

GC: Tutorial Tuesday - Reverse Stencilled Tote Bag!

Crossposted at Geekcrafts.com

Here's a neat idea! lets think 'outside the stencil'.

That's exactly what jennieingram did when she had to quickly step into the Dr Who Swap on Craftster. Round 5 of the Dr Who swap that is... these swaps are hugely popular, they're going to go on forever! Round 6 is crafting away as I type!

Jennie has shared a tutorial on how to achieve this effective technique on her blog, and also on Craftster.

But wait, there's more! Turns out Jennie is quite an avid Geek-Crafter and tutorial writer. Check out her Doctor's Companion Charm Bracelet and her tutorial on how to make Laminated Paper Bookmarks including a sonic screwdriver and a golden snitch.

Tuesday, May 03, 2011

GC: Tutorial Tuesday - Monsties!

I'm just getting crochet-envy now! Check out these adorable Amigurumi mini-monsters (or Monsties, if you will) Created by crocheting blogger and fellow English person EssHaych AKA Sarah from Essex.... I went to university in Essex... small world... anyhow....

You'll have to know something about crochet (unlike me) but she's offering the pattern for how to make these cute little critters for free over on her blog! She's also put together a bright, clear photo tutorial to help you make those pesky legs.

These are just adorable. If I lived in a Studio Ghibli Film I would completely have a little group of them following me around everywhere I go...


Tuesday, April 26, 2011

GC: Tutorial Tuesday: Jesse/Team Rocket Cosplay!

Crossposted at geekcrafts.com

I need this woman to be my wife, and I'm a heterosexual, pregnant, married woman. You boys have got no chance!
Ryoko-demon is a prolific cosplay artist. Here she is, utterly transformed into Jessie from Team Rocket. Her photos are amazing. And to top it all off she's shared a tutorial on how she constructed that MINDBLOWING wig... She EVEN made HER OWN Meowth!! ... I'm just... lost.... for words... need to find more synonyms for awesome...

Via Geekologie

Wednesday, April 20, 2011

Funky Newsprint Nails!

Haha check out my nails!


The base coat is 'peppermint'

Want to have a go yourself? all you need other than your usual kit is some newspaper and VODKA! haha! Check out the tutorial by Foxy Grandpa