Showing posts with label upcycle. Show all posts

Friday, July 06, 2012

Finished! Bazinga! Ipad Sleeve.

I made this


out of this


:-) will put the tutorial together soon... <3

Sunday, March 04, 2012

Finished: "Cross Stitch or Die" Shoes

 OH BABY!!! <3

I love these, and I've learned a lot making them, they're a little rough around the edge, but who the hell cares, no one is going to get close enough to my smelly feet to notice!! haha!

Saturday, September 10, 2011

Nighttime Nursing Bra Top TUTORIAL!

WARNING: frank discussion of breastfeeding and lady-booby-bits... it doesn't bother me so I don't know why it should bother you but, meh, the internet *shrug*

ok, so I spent pretty much... err... yup half my life being generally disappointed with my boobs... well... I've now found my boobs' secret talent. Apparently they're hella good at feeding babies (well... my baby... haven't tried them on other people's babies yet, although I am feeling I may have had quite a profitable career as a wetnurse if such careers still existed...)

So... my boobs are efficient feeding devices, infact:
(Source: http://himynameisben95.tumblr.com/post/6195190507)
oh yea!

Monday, August 01, 2011

Carboot sale stuff...

(psst, don't forget to enter my AWESOME giveaway)

yup... we did it again! (maybe this could be a regular feature... except that you're never guaranteed to get awesome stuff at a carboot sale, I just happen to have been lucky the last few weeks....

There were only 2 things though really, but it's the PRICE that makes them particularly awesome :-) and their upcycleability (yup, that's a 'thing')

Sunday, July 17, 2011

PM: Upcycled Mens shirt into an Empire Line Dress. FINISHED!


6 DAYS TO GOOOOOOO........... !!!!!!!!!!!!!!!!!  !!!!!!!!!!!!! !!!

OK time to come clean... this dress has been finished for AGES!... but .... well it's 'flouncy' and ridiculous... and it feels completely silly sitting around the house in it.

I will be making another one (because even when I don't need the bump-room I'm unlikely to want to be dressed in tight fitting clothes) I have a feeling when I've toned down the colours a little and got rid of the silly frilly/misbehaving collar it'll be a lovely comfortable nursing dress.

ok so lesson learned, don't pair a pattern with another pattern, a flat colour for the shirt or the skirt would be slightly less ridiculous.

but meh, life is for learning.... so here's the pics!!


as you can see (especially in the side-on pic) a 3 inch front hem extension is enough to keep the hem level with bump... I'm 39 weeks pregnant :-)

ooh... and another thing! I've converted the tutorial for this dress into a pdf, you can download it here.
also the stretch mark fairy visited me last night... bad times!

Friday, July 15, 2011

PM: Upcycle a Mens shirt into an Empire Line Dress. TUTORIAL


Now I know it's traditional to post the tutorial after I show you the finished project - but I'm not up for having pictures took of me and my big fat swollen feet at the moment :-)

so here's my first illustrated tutorial!!

This dress is great for many reasons
(1) you can make it as a maternity or a non-maternity dress
(2) you can make it as a maternity dress and then with a quick em adjustment, you can still wear it once your body has shrunk back down to normal proportions ^.^
(3) it doubles up as a nursing dress because it's button up
(4) it's elasticated so you don't have to worry too much about sizing
(5) its SUPER easy!!!

it's ALLL good baby!

EDIT: I dont know what the hell Picasa has done to my pictures to make them so blocky- BUT I've converted these imaged into a PDF that you can download and print. download it here

Friday, July 08, 2011

And now it's a frilly unicorn cushion :-)

see?

So. This baby cushion is (surprisingly) made out of upcycled materials... the floral base fabric is a duvet cover and the bias binding edging to the frill is made from an old pillowcase (I love it and I've got loads more, making your own binding strip is such a good way of using up small amounts of fabric)

And I've made it into a cushion cover so it can be removed and washed (and so I can make other covers :-))

The size of the cushion pad itself is 12"x12" (I made it out of a spare pillow we had in the house)


:-) very happy... and if Squiggle is a boy...  then this is my cushion :-)

Friday, June 10, 2011

Maternity 'Pirate' Top - Mens shirt upcycle - Tutorial


OK,  as promised a TUTORIAL for my men's shirt upcycle :-) I've made this as a maternity piece but it could of course suit the un-pregnant ladies out there who are best served by an empire line for whatever reason...

Sunday, June 05, 2011

TG: 33 Weeks!!


We're into countdown mode now, 33 weeks, 7 weeks left to go!

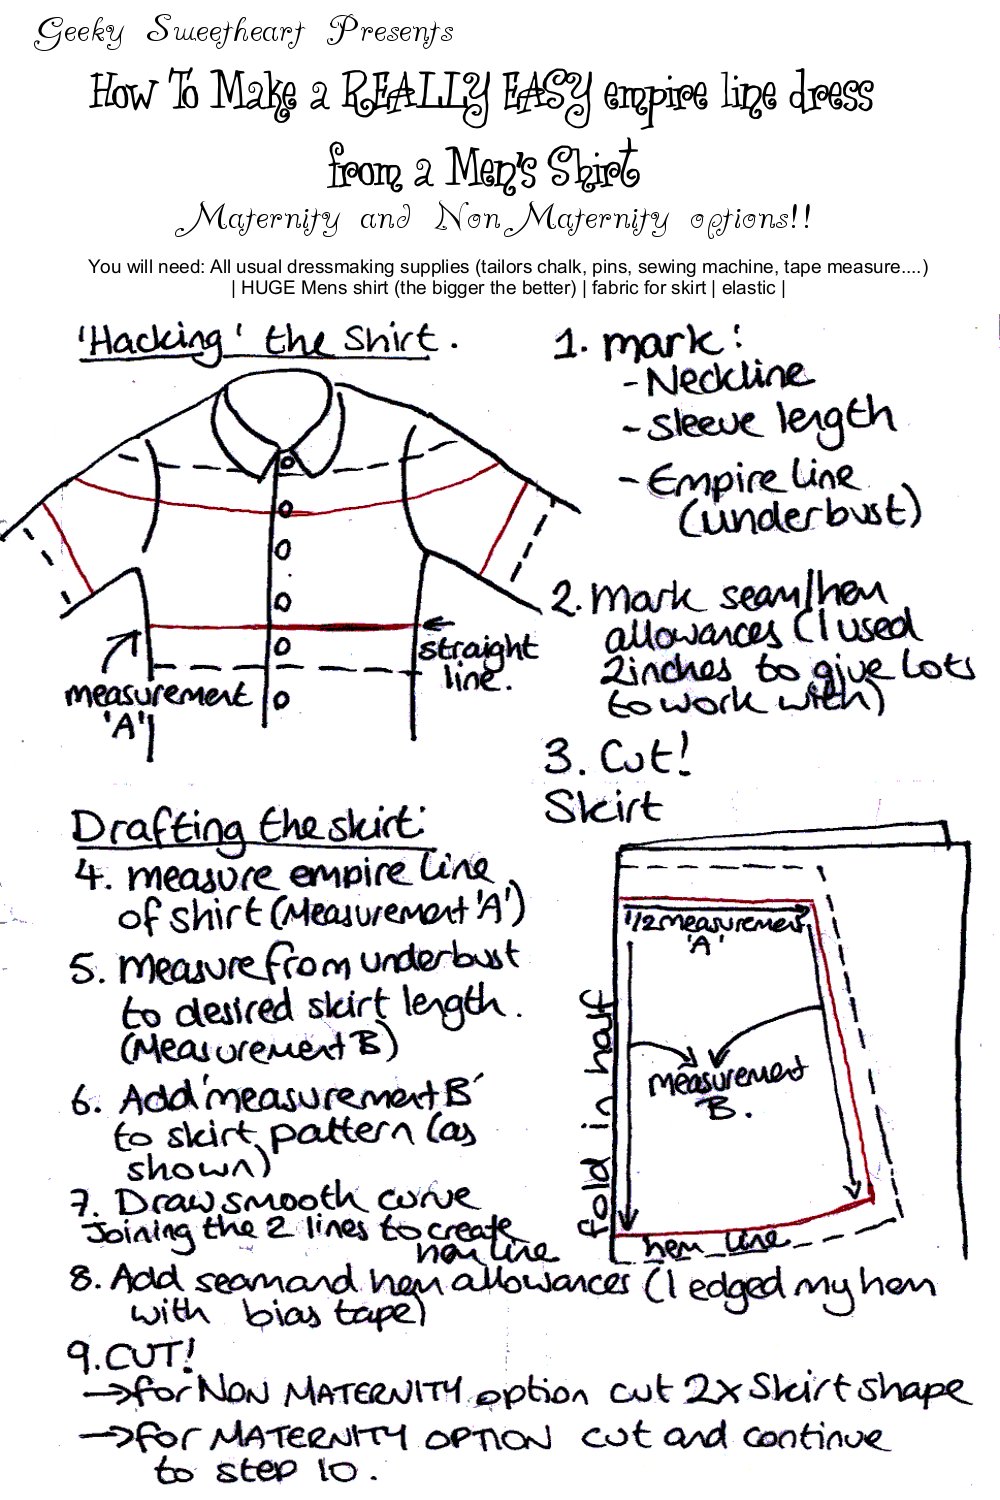
This is a top I made myself out of a men's shirt. It was intended to just give me something to wear to a pirate theme party I went to last weekend, but it's turned out to be the most comfortable top EVER.

I'm on maternity leave from work now and I'd been squeezing myself into an array of maternity and non-maternity wear since I was determined not to buy anything new for the last couple of weeks. Being able to dress casually full time now (and even just in my PJs if I like) is SUCH a relief!

Anyhow... I took lots of pictures, so a tutorial for making a top like this will be coming up this week. It took no time at all!! and I've even gone out and bought a couple more shirts (from charity shops - of course!) so I can make some more and perhaps make a dress modification (did I mention it's the most comfortable thing ever?)

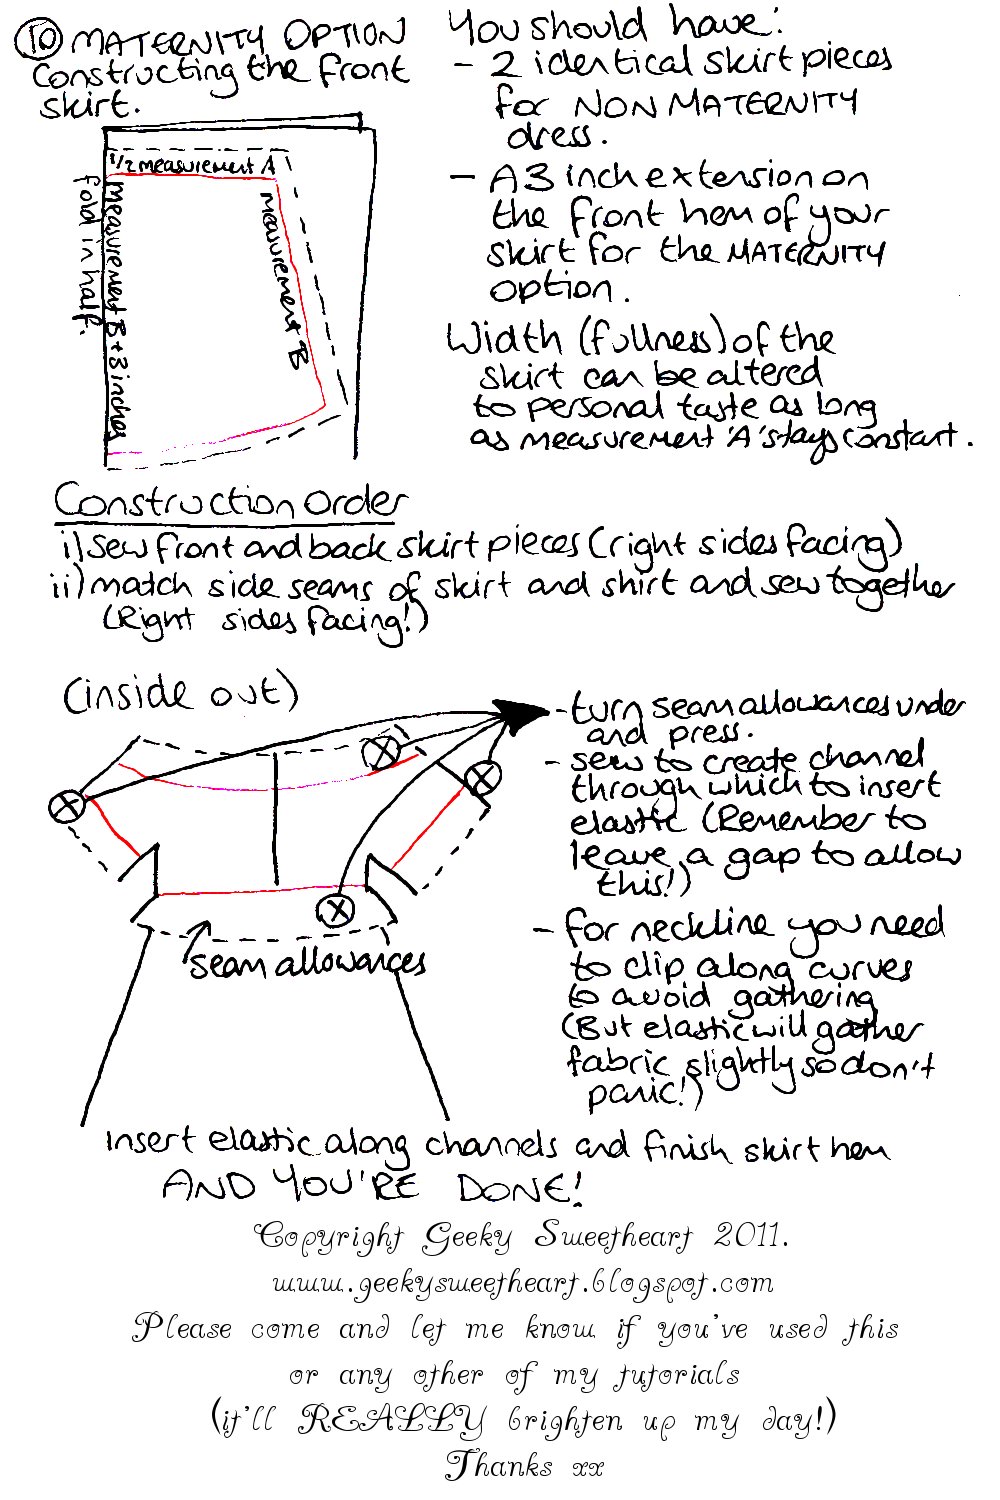
EDIT: Tutorial is UP!! - HERE

My baby related thoughts are:
I'm thinking about...  going for a water birth, the hospital I'm going to is well equipped for water births (I believe) and I'll talk to my midwife about it when I see her next.
The Husb0t has begun... clearing out 'his' StarWars room so it can start receiving baby related furniture.
I have... a gym ball! so I can sit on it to encourage my Squiggle to get in the correct position for birth - if the Husb0t will ever get off the damn thing!
I'm frustrated... that there doesn't seem to be anything going on in the NCT Branch where I live. I'm going to invite some of my antenatal class ladies round to sew some breastfeeding pillows and stuff... if they want.. I'll be doing it anyway so it's a good way of them getting something for nothing (and a good way for me to reduce my stash!)

Monday, May 02, 2011

PM: Whole Lotta Baby Dress - Tutorial


Lets have another look at that dress:


not pregnant? don't panic! you can still make this dress and be (almost) as awesome as us pregnant ladies!

Whole Lotta Baby Upcycled T-shirt dress TUTORIAL

You will need:
  • 2 Large Mens T-shirts
  • some scrap stretch jersey fabric (or another T-shirt)
  • A T shirt/vest that fits you comfortably (Template t-shirt - with similar stretch properties to your donor T shirts)
  • A sewing machine (or even better - a Serger!)
  • Stretch fabric needles
  • Dressmaker’s chalk
  • Suitable scissors
  • Pins
Measurements:
Put on your template T shirt and draw a line where your bump begins (or your empire line - under bust - this is where your skirt will flare out from) and where your bump ends (or your hips - where your body is widest when you are not pregnant! this is where your skirt will be attached.) decide how long you want your skirt to be

Notes on Sewing Stretch Fabrics.
a) for best results use needles specifically designed for knit or stretch fabrics, ballpoint needles will work, needles which are specifically labelled for jersey fabric, or labelled ‘stretch’ are good. Regular needles will punch through the fibres of the fabric, possibly causing bigger holes or ripping/weakening of the fabric.

b) 99% of the people following this tutorial probably don’t have a serger.... that’s sad because sergers LOVE t-shirt fabric! if you’re using a regular sewing machine you should use a zig-zag stitch (here’s a video that might help) Zig zag stitch stretches, straight stitch doesn’t.

Steps:
1) using your template T-shirt, trace around the T-shirt that will form the top of your dress, down to the 'top bump line’
2) from the 'top bump line’ carry on the line straight down to form a square edge against the bottom bump line.
3) add seam allowances (I didn’t have enough spare fabric for regular seam allowances so I just sewed along the construction lines)
4) take your 2nd t-shirt (which you’re going to make your skirt out of) and pin together front and back of the T-shirt.  Draw a rectangle the width of the bottom of the top piece, and the length of the desired drop of the skirt (from bottom bump line), plus seam and hem allowance.


Are you pregnant? - make the maternity dress by following step 5a .... not pregnant? make a regular dress by following step 5b
5a) create a curve at the bottom of your rectangle, this will form your front hem shape and stop your skirt from rising up as your bump grows. My curve extends the front middle hem by about 2.5/3 inches. Cut this shape (which should give you 2 if you’ve got front and back pinned together) - flip the whole thing over and trim the back skirt piece so that hem shape there is straighter. You can check and tweak this later so don’t worry too much about straight hems at this points.
5b) Cut your rectangle shape (which should give you 2 if you’ve got front and back pinned together) this should give you your front and back skirt pieces. You can check and tweak the hemline later so don’t worry too much about straight hems at this points.
6) sew together your top t-shirt and the rectangle skirt pieces (right sides facing!!) at under bump line (or hip line)

 IF YOUR WORK LOOKS LIKE THIS YOU'RE DOING IT WRONG!! - step back form your work, sit in the corner and chant 'right sides facing'for 5 minutes.... 

7) draft your ‘wedge’ you need a wedge of fabric to help form your dress... mine is red. it needs to be the length of your empire line/over bust line->the bottom of your hem, but other than that it’s up to you how far you make your dress to flare out at the bottom. Don’t forget to add seam/hem allowances. It also makes it easier if the top of your wedge is clipped a little so you can see where your hem allowance ends.
8)sew in first side of wedge (remember right side facing!)
9) match up your side seams right from the armpit down to the bottom hem, pin it all together paying special attention to where the wedges begin and the skirt flares out.
10) sew side seams right sides facing. Turn right side out, try on give yourself a little clap, check hems/fit etc and tweak as necessary.
Finishing
I’ve got a serger, so I just whipped out my 3 stitch serging stitch and ran across the bottom hem, I also finished the neckline and sleeves with bias tape.
Alternatives - you can hem the bottom hem or leave it raw (t-shirt fabric doesn’t fray), you can also use this technique for finishing the edges with scraps of fabric you may have cut off the T-shirts in the process of making the dress.


Monday, April 25, 2011

GC: Reader Submission. Pop Tab Prom Dress


Proud father Steve Pozek sent GeekCrafts some lovely pictures of his (stunning) daughter Maura Pozek who created a truly unique prom dress. Looking at the full length picture (right) you don't quite get the scope of how awesome this dress truly is. Yes, look closely, this prom dress is woven out of pop tabs, ribbon - and, I'm guessing - a whole lotta blood, sweat and tears.

See the full post over at www.geekcrafts.com


Pop the top on another energy drink and make a Prom dress? Sure, why not? This
dress uses 400 yards of ribbon, nearly 4000 pop tabs, and the patience of 100
hours of tedious weaving (sort of like writing code, only more boring and
mind-numbing).

As the proud parent, I watched my 16 year old daughter surrounded by her laptop,
a Netflix subscription, and cellphone (for that all important texting), labor
over this work of art.

Monday, March 21, 2011

Nick Nak Bags for Bits and Bobs

yeyy more fused plastic bags!!
behold! ... what I'm calling a 'mini tote' and a clutch bag! ... click here if you want to know more about plastic fusing.

Lets look more closely and compare to previous attempts!
Lets look at the prototype

This bag was constructed out of 7 separate pieces (the sides and base were made from fusing bin bags together) and the straps are also made out of fused plastic... which took a long time and made bloody uncomfortable handles! the raw edges are exposed inside.

Now lets look at the next generation:


Improvements:
  1. Closures!!! a Zip on the clutch and Velcro on the tote
  2. Simpler and more effective construction process... each bag effectively now only contains 2 pieces of fused plastic (front and back) and the sides and base are made using this technique. This eliminates the need for finding colour coded plastic to create bases and sides... . something that would be impossible :-) 
  3. Lining! isn't it pretty!! it opens the door for adding pockets etc and really gives a better finish to the completed article.
  4. Cotton webbing tape used for handles: makes MUCH nicer handles (ones that don't scratch your arm to bits!) Making handles out of fused plastic just not practical given the unpredictable nature of the 'shrinkage' that occurs with fused plastic.
I'm so pleased!! :-) I cant wait to make more and maybe even start selling some!!

Saturday, January 22, 2011

Space Raiders Fused Plastic Tote

there are lots of tutorials for this technique, and I suggest you look at many different ones, and experiment before trying to make anything aesthetically pleasing. This can go all sorts of wrong, over ironed plastic is not good:
the monster on the right has a bad case of 'plastic pox' on his nose.... it didn't photograph well but its GLARINGLY ugly in real life... anyhow...

Here's a good tutorial from KittyKill, one of the craftster Goddesses


So, no excuses, don't be blaming me if you melt plastic to your iron or pass out from plastic burning fumes, you have been warned!!

The great thing about fused plastic is that once you've done all the ironing you can sew it very much like you would sew fabric, with no worries about fraying edges or grainlines. Just let the fun printed designs do the hard work for you, see exhibit A:


I could have used binbags to fuse to the underside of the plastic and hidden the carrier bags, but I like the 'recycled' look. Also when I'm explaining how it was made it's much easier if I show them the carrier bags on the inside.

My new favourite bag!

x G