Showing posts with label dresses. Show all posts

Thursday, September 29, 2011

You Are Witnessing the Birth of a Dress....

Its not a great picture, but it's not a great dress... yet...
this is the first draft of the first dress that I've designed, draped and made from NOTHING, the first attempt, the bodice was about 3 inches too high... I've just added some length to the straps and it looks a lot more like a proper dress...

So I need to lengthen the straps and redraft the armholes to match, I might change the back dart (it's a bit sack-like) I'm going to abandon the triangular panels at the waist as I don't think they add anything... it's be different if I was blocking it in different colours, but I've got some lovely patterned fabric that can speak for itself....

and, as you can see, it's boobie-feeding friendly... if I pull this off I should be able to put together a tutorial on how to modify a pattern to include a nursing panel... fun fun fun... anyhow... I'd better get going... Squiggle's asleep, must make the most of this time...

Sunday, July 17, 2011

PM: Upcycled Mens shirt into an Empire Line Dress. FINISHED!


6 DAYS TO GOOOOOOO........... !!!!!!!!!!!!!!!!!  !!!!!!!!!!!!! !!!

OK time to come clean... this dress has been finished for AGES!... but .... well it's 'flouncy' and ridiculous... and it feels completely silly sitting around the house in it.

I will be making another one (because even when I don't need the bump-room I'm unlikely to want to be dressed in tight fitting clothes) I have a feeling when I've toned down the colours a little and got rid of the silly frilly/misbehaving collar it'll be a lovely comfortable nursing dress.

ok so lesson learned, don't pair a pattern with another pattern, a flat colour for the shirt or the skirt would be slightly less ridiculous.

but meh, life is for learning.... so here's the pics!!


as you can see (especially in the side-on pic) a 3 inch front hem extension is enough to keep the hem level with bump... I'm 39 weeks pregnant :-)

ooh... and another thing! I've converted the tutorial for this dress into a pdf, you can download it here.
also the stretch mark fairy visited me last night... bad times!

Friday, July 15, 2011

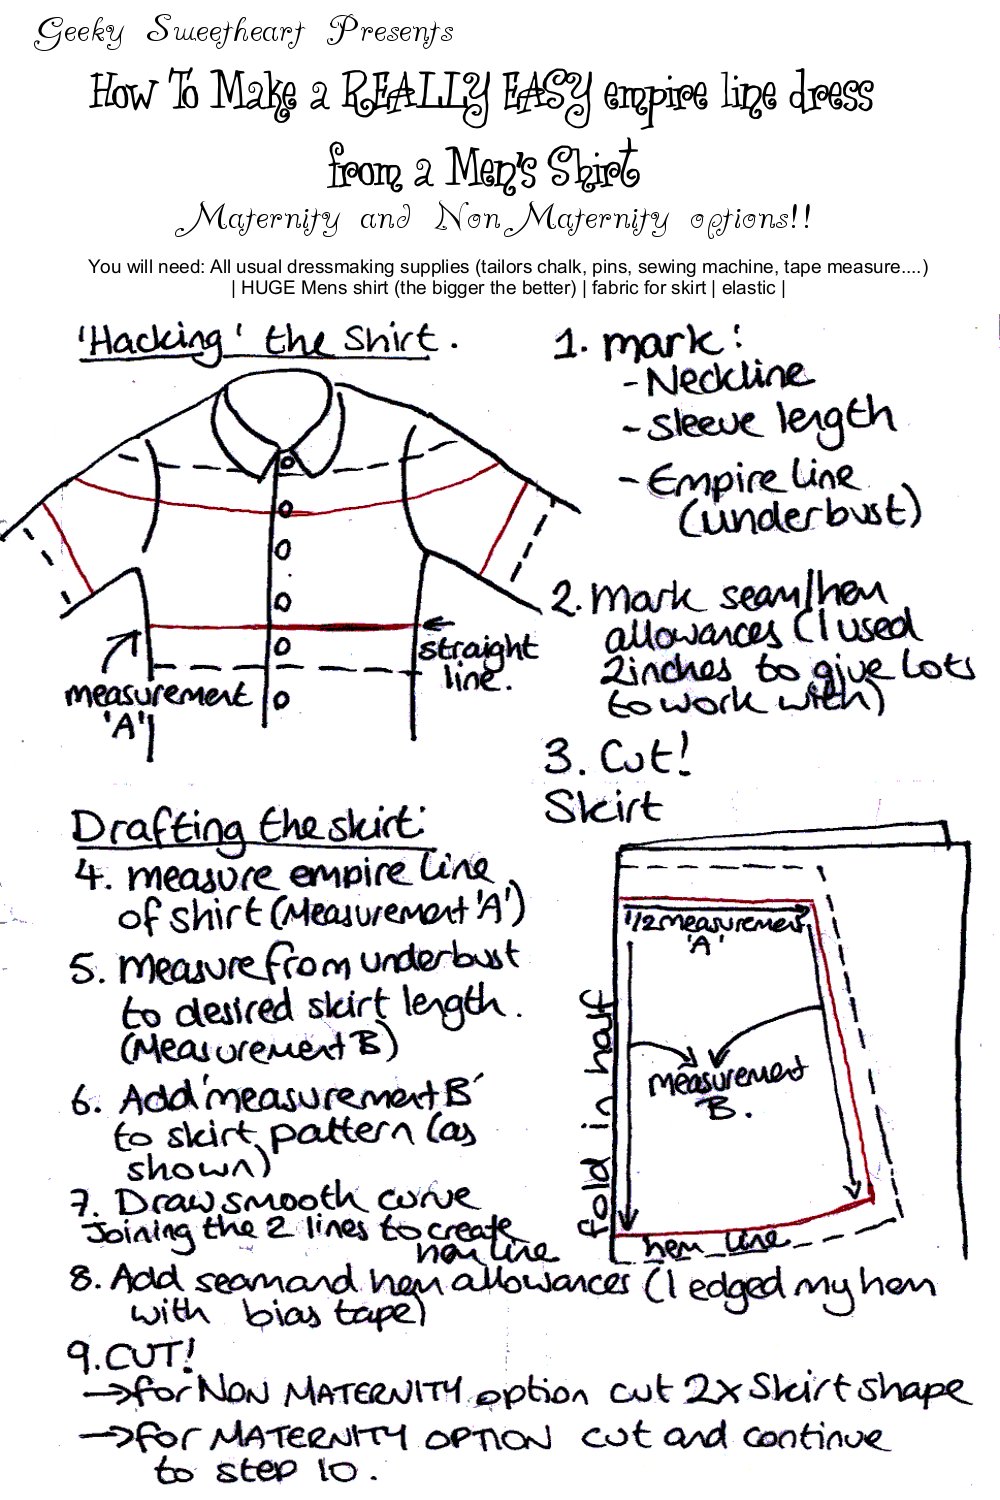
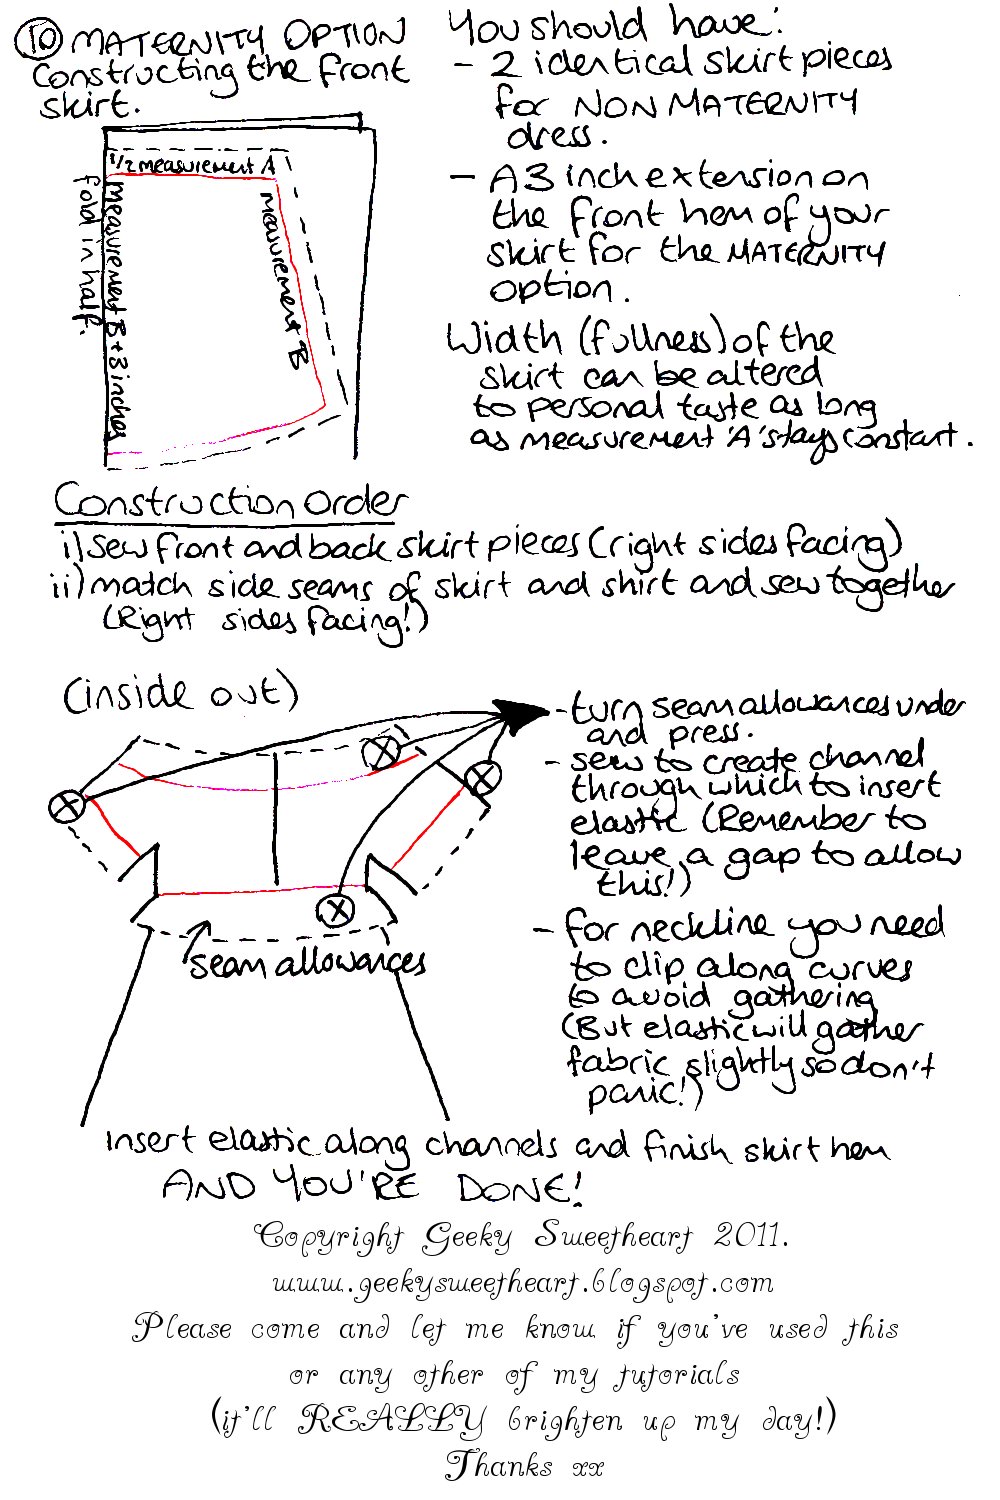
PM: Upcycle a Mens shirt into an Empire Line Dress. TUTORIAL


Now I know it's traditional to post the tutorial after I show you the finished project - but I'm not up for having pictures took of me and my big fat swollen feet at the moment :-)

so here's my first illustrated tutorial!!

This dress is great for many reasons
(1) you can make it as a maternity or a non-maternity dress
(2) you can make it as a maternity dress and then with a quick em adjustment, you can still wear it once your body has shrunk back down to normal proportions ^.^
(3) it doubles up as a nursing dress because it's button up
(4) it's elasticated so you don't have to worry too much about sizing
(5) its SUPER easy!!!

it's ALLL good baby!

EDIT: I dont know what the hell Picasa has done to my pictures to make them so blocky- BUT I've converted these imaged into a PDF that you can download and print. download it here

Monday, May 02, 2011

PM: Whole Lotta Baby Dress - Tutorial


Lets have another look at that dress:


not pregnant? don't panic! you can still make this dress and be (almost) as awesome as us pregnant ladies!

Whole Lotta Baby Upcycled T-shirt dress TUTORIAL

You will need:
  • 2 Large Mens T-shirts
  • some scrap stretch jersey fabric (or another T-shirt)
  • A T shirt/vest that fits you comfortably (Template t-shirt - with similar stretch properties to your donor T shirts)
  • A sewing machine (or even better - a Serger!)
  • Stretch fabric needles
  • Dressmaker’s chalk
  • Suitable scissors
  • Pins
Measurements:
Put on your template T shirt and draw a line where your bump begins (or your empire line - under bust - this is where your skirt will flare out from) and where your bump ends (or your hips - where your body is widest when you are not pregnant! this is where your skirt will be attached.) decide how long you want your skirt to be

Notes on Sewing Stretch Fabrics.
a) for best results use needles specifically designed for knit or stretch fabrics, ballpoint needles will work, needles which are specifically labelled for jersey fabric, or labelled ‘stretch’ are good. Regular needles will punch through the fibres of the fabric, possibly causing bigger holes or ripping/weakening of the fabric.

b) 99% of the people following this tutorial probably don’t have a serger.... that’s sad because sergers LOVE t-shirt fabric! if you’re using a regular sewing machine you should use a zig-zag stitch (here’s a video that might help) Zig zag stitch stretches, straight stitch doesn’t.

Steps:
1) using your template T-shirt, trace around the T-shirt that will form the top of your dress, down to the 'top bump line’
2) from the 'top bump line’ carry on the line straight down to form a square edge against the bottom bump line.
3) add seam allowances (I didn’t have enough spare fabric for regular seam allowances so I just sewed along the construction lines)
4) take your 2nd t-shirt (which you’re going to make your skirt out of) and pin together front and back of the T-shirt.  Draw a rectangle the width of the bottom of the top piece, and the length of the desired drop of the skirt (from bottom bump line), plus seam and hem allowance.


Are you pregnant? - make the maternity dress by following step 5a .... not pregnant? make a regular dress by following step 5b
5a) create a curve at the bottom of your rectangle, this will form your front hem shape and stop your skirt from rising up as your bump grows. My curve extends the front middle hem by about 2.5/3 inches. Cut this shape (which should give you 2 if you’ve got front and back pinned together) - flip the whole thing over and trim the back skirt piece so that hem shape there is straighter. You can check and tweak this later so don’t worry too much about straight hems at this points.
5b) Cut your rectangle shape (which should give you 2 if you’ve got front and back pinned together) this should give you your front and back skirt pieces. You can check and tweak the hemline later so don’t worry too much about straight hems at this points.
6) sew together your top t-shirt and the rectangle skirt pieces (right sides facing!!) at under bump line (or hip line)

 IF YOUR WORK LOOKS LIKE THIS YOU'RE DOING IT WRONG!! - step back form your work, sit in the corner and chant 'right sides facing'for 5 minutes.... 

7) draft your ‘wedge’ you need a wedge of fabric to help form your dress... mine is red. it needs to be the length of your empire line/over bust line->the bottom of your hem, but other than that it’s up to you how far you make your dress to flare out at the bottom. Don’t forget to add seam/hem allowances. It also makes it easier if the top of your wedge is clipped a little so you can see where your hem allowance ends.
8)sew in first side of wedge (remember right side facing!)
9) match up your side seams right from the armpit down to the bottom hem, pin it all together paying special attention to where the wedges begin and the skirt flares out.
10) sew side seams right sides facing. Turn right side out, try on give yourself a little clap, check hems/fit etc and tweak as necessary.
Finishing
I’ve got a serger, so I just whipped out my 3 stitch serging stitch and ran across the bottom hem, I also finished the neckline and sleeves with bias tape.
Alternatives - you can hem the bottom hem or leave it raw (t-shirt fabric doesn’t fray), you can also use this technique for finishing the edges with scraps of fabric you may have cut off the T-shirts in the process of making the dress.


Saturday, April 30, 2011

PM: Whole Lotta Baby Dress


So I made a dress, I made it out of 2 T-shirts and some scrap red fabric... it looks like this:


And in err... more normal light... 

of course... tutorial... coming soon

Monday, April 25, 2011

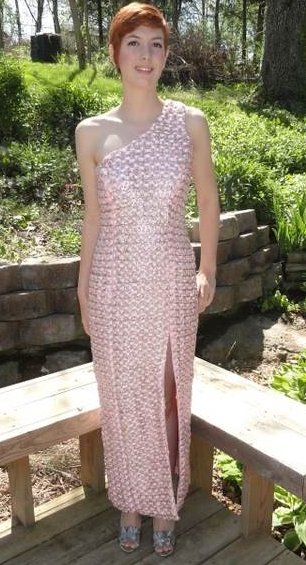
GC: Reader Submission. Pop Tab Prom Dress


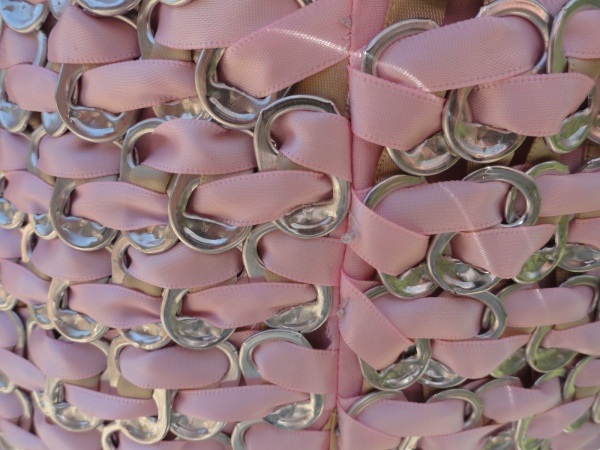
Proud father Steve Pozek sent GeekCrafts some lovely pictures of his (stunning) daughter Maura Pozek who created a truly unique prom dress. Looking at the full length picture (right) you don't quite get the scope of how awesome this dress truly is. Yes, look closely, this prom dress is woven out of pop tabs, ribbon - and, I'm guessing - a whole lotta blood, sweat and tears.

See the full post over at www.geekcrafts.com


Pop the top on another energy drink and make a Prom dress? Sure, why not? This
dress uses 400 yards of ribbon, nearly 4000 pop tabs, and the patience of 100
hours of tedious weaving (sort of like writing code, only more boring and
mind-numbing).

As the proud parent, I watched my 16 year old daughter surrounded by her laptop,
a Netflix subscription, and cellphone (for that all important texting), labor
over this work of art.

Wednesday, April 13, 2011

PM: Jersey Dress COMPLETED


I've been quiet on the Project Maternity front for too long, in the words of Blink 182: "Work Sucks, I know"

What doesn't suck is this dress:
I'm not that keen on the colour, the green is a lot duller than I'd first intended. The pattern I butchered was from Burda Style magazine, it's not been published on this website yet, when it is I'll post a link.

As you can see I completely changed the pattern around, I got rid of that collar because I don't have time to learn how to do collars... I'm GROWING!! I also modified the sleeves, to make them the more summer-friendly tent sleeve shape.

How I did it:
  • I traced the pattern pieces from the Burda Style Pattern Sheet.
  • I used this great technique on burdastyle on how to create a Tent Sleeve (thankyou BurdaStyle member sunnie for contributing this technique)
  • I modified the front pattern piece by performing a full tummy adjustment, with the effect of lengthening the front hem
  • I cut the fabric, but as I said I was omitting the collar so I just cut the front piece on the fold and rounded off the neckline at this stage.
  • I redrew the neckline on the fabric and after checking it was symmetrical and giving myself a seam allowance for the ruffle, I cut the new neckline.
  • I drafted my pattern for my ruffle. Ruffles can be made lots of different ways A separate tutorial for how I did this collar ruffle is coming soon!
  • I serged the edges of the sleeves and the ruffle using a 3 thread setting so that the weight of a hem wouldn't ruin the drape.
  • I constructed the garment with my serger, on a 4 thread setting, in this order:
    (1) attach front piece to back piece at shoulder seams
    (2) sew on sleeves.
    (3) sew sides together with seams that run from end of sleeve to bottom hem.
    (4) attach ruffle collar as you would a facing - right side of ruffle facing wrong side of dress - use regular sewing machine on zig-zag setting.
    (5) finish hem by turning over twice, pressing and zig-zag stitching.
In retrospect, I think this dress is probably still too big. I think the pattern I cut was too big in the first place, but actually that's completely welcome in the heatwave we're having in the UK, and my classroom is so hot too!! Not to mention the fact that I am growing! I love the sleeves, I think some kind of interfacing around the collar would be a good idea as it feels a bit shapeless. I think the hem should be shorter... but then what is the appropriate hem length for a pregnant lady?

I wish I was better at modelling... 

Tuesday, September 14, 2010

What I did on my lunch break today....

50's style shelf bust with poofy lolita style skirt... oh.. and hello kitty detail!

I think I could get used to this clothes designing malarky.... I REALLY REALLY need a dressform!

this seems good at argos an adjusable dressform for £100...  tempted!... .

x G

Saturday, July 24, 2010

Superman Dress, Not so Super Actually!

I got really (super?) excited over the craftster bed sheet getup competition. I was dissapointed in myself because I was unable to get more than one good picture of it, as neither me or Alex own a great camera. The only pictures I have were from a night out in Oxford.

anyhow... there were many many entries and the winner (who wasn't me) deserved their T-shirt.
here's a screengrab with the ultimate outcome, as you can see, with 9 votes (2.1% nonetheless!) I still got more votes than many other people, which pleases me... but what the hell is up with people who got no votes? you could vote for yourself?! either I'm much less honourable than most of the craftster community or there are some really dense peapods out there....

x G

Monday, June 07, 2010

OO lookee what the postman got me!


check it out! its a great shirt-dess pattern I got off ebay... I won't be making it just yet as I'm saving myself for the Marian Martin/Anne Adams patterns I got from the US but isn't it gorgeous?

Friday, June 04, 2010

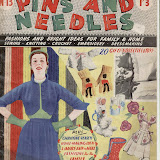
pins and needles no13 1952

My future sister in law bought me this magazine as part of my birthday present (oh I know it's not my birthday yet but she made me open it.)
Anyhow I'll be serialising parts of this magazine on my blog and possibly making some of the projects from it (with a Geeky twist) anyway, since I scanned the whole thing I've uploaded it to picasa and you can look at it's beautiful shiny pages by clicking the link below!


Sunday, May 23, 2010

THE GLEE DRESS!! (or a series of unfortunate events)

Are you sitting comfortably? then I will begin... a tale of dressmaking foolishness so severe that it will make your thread form unfathomable knots and your pins bend clean in half.
Against my better judgement I have become embroiled with Glee, the kids at work love it and the lovely bright cheerful (gleeful) world the characters inhabit helps me remember that life is not all doom and gloom. Also it taught me that dolphins are just gay sharks :-)So when watching episode 14 (Hell-O) I saw this shot:and something happened inside me... I think it's what you earthlings call.. love...
This wonderful epiphany came over me... I can make this... this is why sewing is awesome!
(also on a side note I'm conflicted over Amber's dress... I kinda want to give her a bigger bow, or alter the dress slightly to make it a little more flattering... is that a bad thing? I don't know)
So during y10 parent's evening (oh so many stressed out students) I doodled this:and I sould have stuck to this, simple nice A line dress.. but no.. I had to be a smartarse... so I than drew this:with no thought to the fact that I'd never drafted a pattern before or no serious attention paid to the fact that the fashion figures I was doodling on are not shaped anything like me... fools rush in where angels fear to tread!.. also I'd clearly not actually thought about the construction of the garment AT ALL since I've not included any seamlines except that for the ruffled bottom with which I was infatuated.was this dress a failure? HELL-Yea.. Did I end up having to bodge it back together to make it like the first sketch? of course I did... facepalm:
so without further adieu, pictures of my glee dress... the outside looks fine (thank God or I think I'd be hanging myself with my mic cord) but the lining shows the scars of (1) being used as a muslin for a home drafted pencl skirt dress (2) having to be let out and chopped in different areas to make it fit the now Aline dress and (3) having sleeve facings applied after the lining had been sewn in ... pretty bad show old chap.

G <3

Monday, May 10, 2010

Cate has the POWER!


You may need this

Ok here's the deal, I'm a geek, I'm a girl and like sewing.

put it together and what do you got? (bibbety bobbety booo)


As you know on Saturday I found this AWESOME Duvet cover in a charity shop in Aylesbury town centre, the tag said apologetially "£1.50, NO PILLOW SLIP" ... and I cried a little inside for how beautiful it was.

first the colours are slightly washed out which gives it a pastel-y colour and it's just COVERED in cartoon characters, I mean, wow. geek ... love ...

I was highly aware that I was making a dress out of a duvet cover, I didn't want it to look like a dress made out of a duvet cover. But I needed a pattern and I needed it now so that meant burdastyle. I've been using Burdastyle since February and it's a great place to learn to sew, if you, like me, would prefer to learn from the internet than an actual person. I ended up using this pattern "Cate" (hence the name *facepalm*)

First things first, I had to pay for it... BOO! but I swallowed the pill and suffered for my art... still cheaper and quicker than buying a pattern on e-bay and waiting for it to be delivered.
Secondly, the instructions weren't great, this is the first pattern I've bought and on the free patterns I accepted the bizarre gaps in instuctions, unreadable characters and undecipherable sizing... I just thought that was the price you pay for free patterns... 'parrently not... it's on the paid ones too.

But on the plus side it's labelled as an advanced skill level... awesome, 3 months and I'm sewing things that are considered 'advanced' :-) well that makes me feel better...

I can't wait to wear this dress out :-)

xLx