Showing posts with label maternalicious. Show all posts

Saturday, September 10, 2011

Nighttime Nursing Bra Top TUTORIAL!

WARNING: frank discussion of breastfeeding and lady-booby-bits... it doesn't bother me so I don't know why it should bother you but, meh, the internet *shrug*

ok, so I spent pretty much... err... yup half my life being generally disappointed with my boobs... well... I've now found my boobs' secret talent. Apparently they're hella good at feeding babies (well... my baby... haven't tried them on other people's babies yet, although I am feeling I may have had quite a profitable career as a wetnurse if such careers still existed...)

So... my boobs are efficient feeding devices, infact:
(Source: http://himynameisben95.tumblr.com/post/6195190507)
oh yea!

Sunday, July 17, 2011

PM: Upcycled Mens shirt into an Empire Line Dress. FINISHED!


6 DAYS TO GOOOOOOO........... !!!!!!!!!!!!!!!!!  !!!!!!!!!!!!! !!!

OK time to come clean... this dress has been finished for AGES!... but .... well it's 'flouncy' and ridiculous... and it feels completely silly sitting around the house in it.

I will be making another one (because even when I don't need the bump-room I'm unlikely to want to be dressed in tight fitting clothes) I have a feeling when I've toned down the colours a little and got rid of the silly frilly/misbehaving collar it'll be a lovely comfortable nursing dress.

ok so lesson learned, don't pair a pattern with another pattern, a flat colour for the shirt or the skirt would be slightly less ridiculous.

but meh, life is for learning.... so here's the pics!!


as you can see (especially in the side-on pic) a 3 inch front hem extension is enough to keep the hem level with bump... I'm 39 weeks pregnant :-)

ooh... and another thing! I've converted the tutorial for this dress into a pdf, you can download it here.
also the stretch mark fairy visited me last night... bad times!

Friday, July 15, 2011

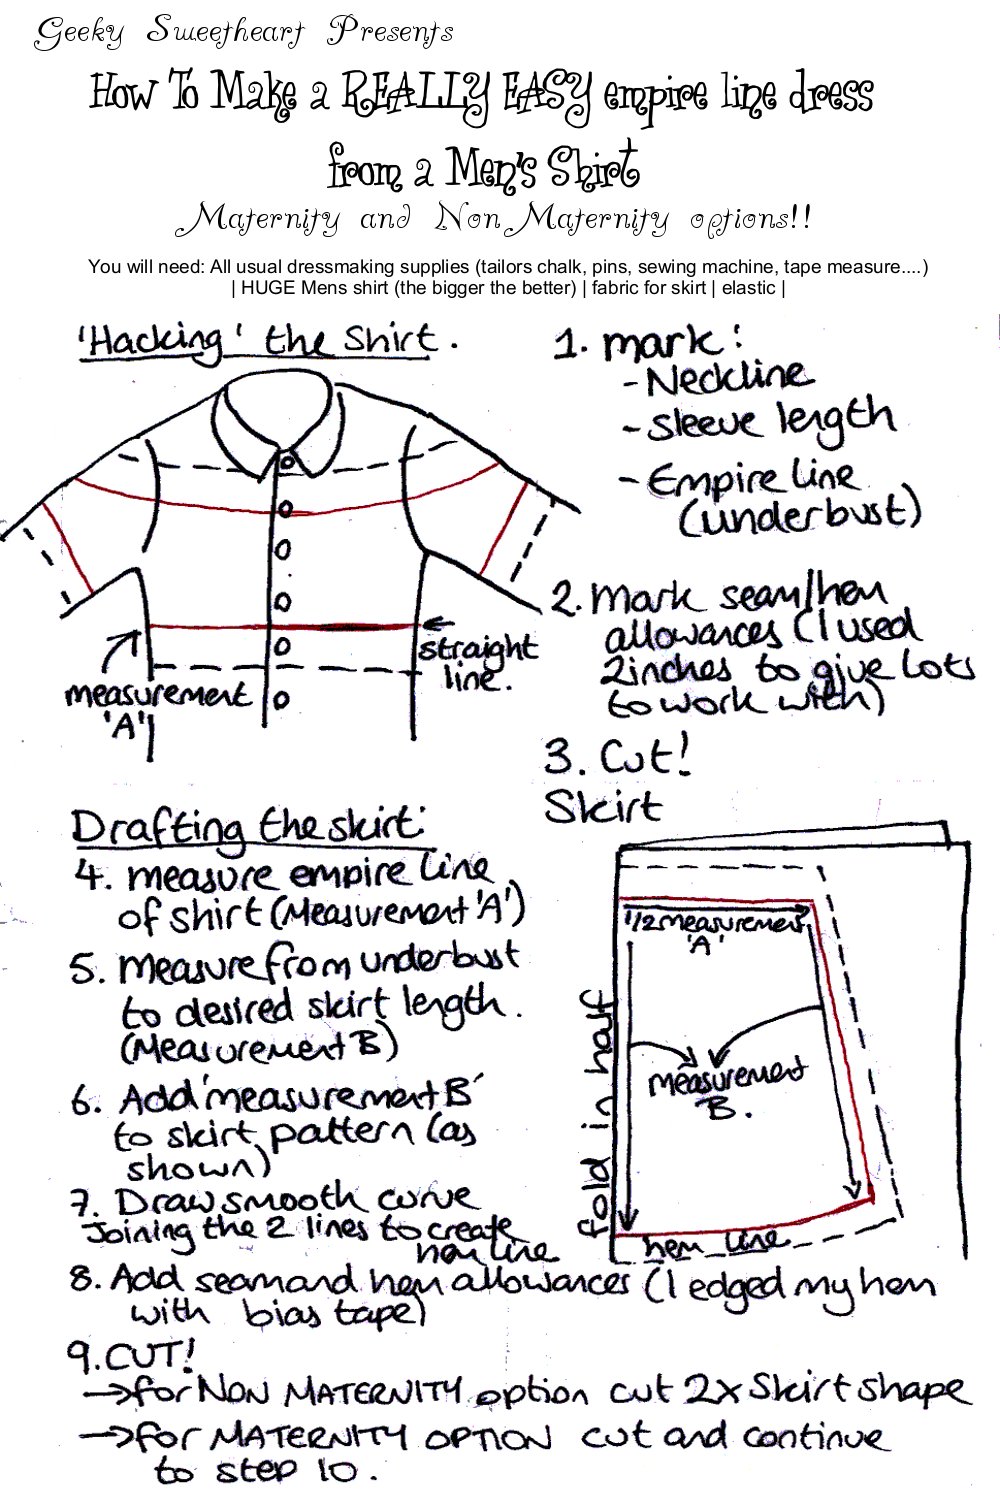
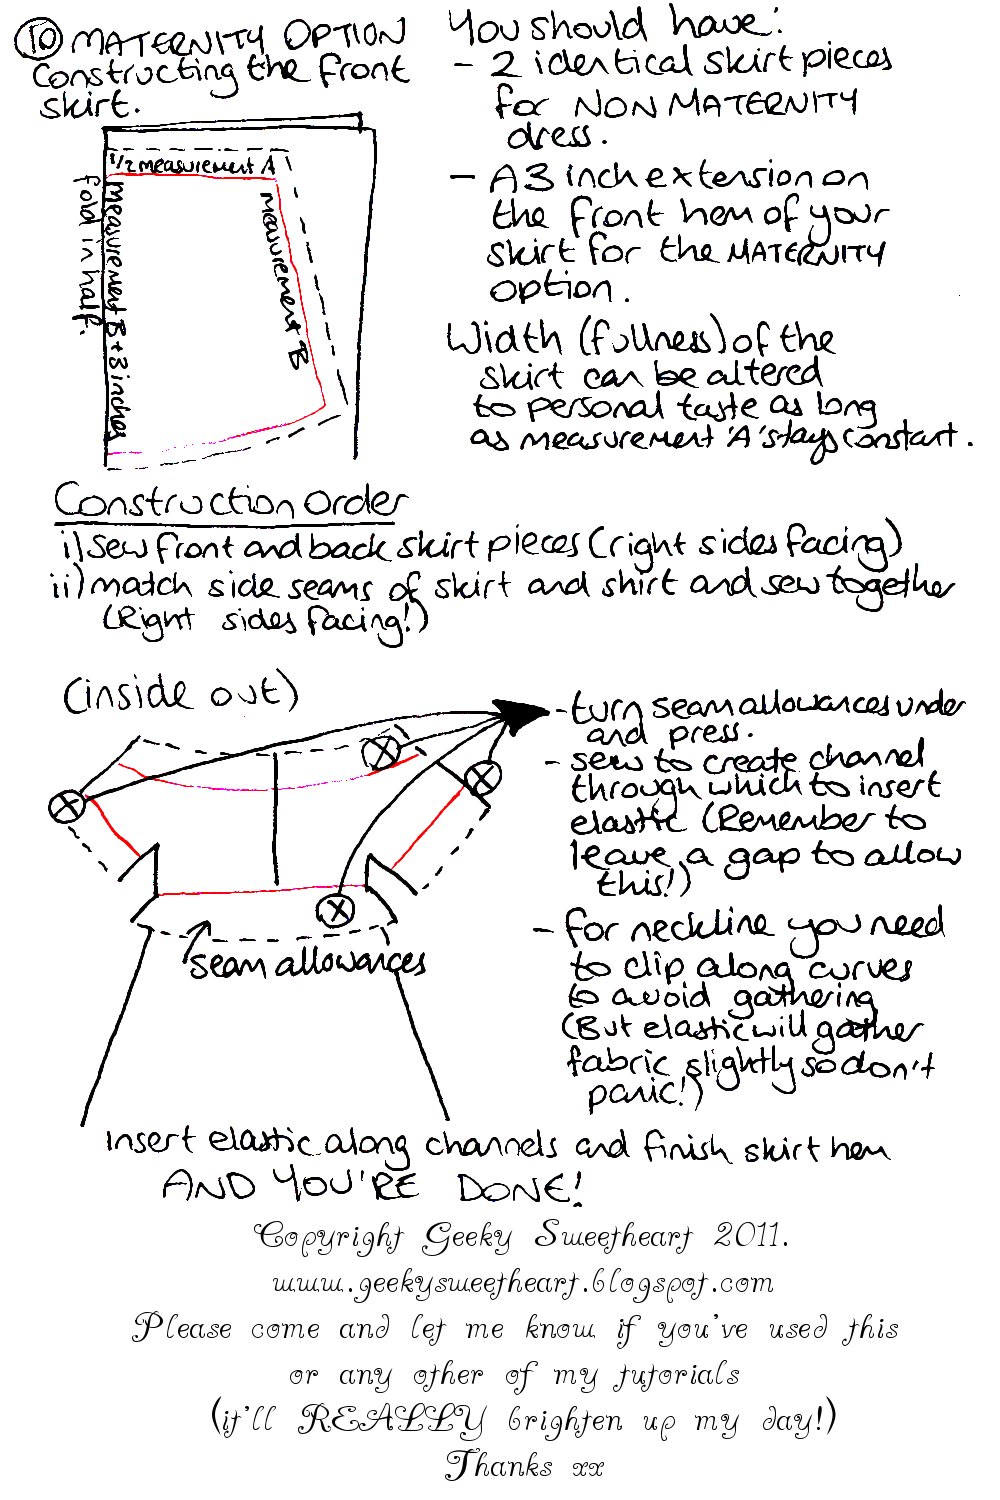
PM: Upcycle a Mens shirt into an Empire Line Dress. TUTORIAL


Now I know it's traditional to post the tutorial after I show you the finished project - but I'm not up for having pictures took of me and my big fat swollen feet at the moment :-)

so here's my first illustrated tutorial!!

This dress is great for many reasons
(1) you can make it as a maternity or a non-maternity dress
(2) you can make it as a maternity dress and then with a quick em adjustment, you can still wear it once your body has shrunk back down to normal proportions ^.^
(3) it doubles up as a nursing dress because it's button up
(4) it's elasticated so you don't have to worry too much about sizing
(5) its SUPER easy!!!

it's ALLL good baby!

EDIT: I dont know what the hell Picasa has done to my pictures to make them so blocky- BUT I've converted these imaged into a PDF that you can download and print. download it here

Sunday, June 26, 2011

36 Weeks: Our bodies are too bumpalicious for ya babe!


This weekend I had Tea and cake with my pregnant lady friends from my NCT antenatal class :-) it was nice. The cups were big and they matched the teapot (no photo for this you're just going to have to take my word for it)

Here are our tummies!!
haha I have a friend who has a phobia of pregnant women (srsly...) ... This would be his WORST nightmare.

Why don't you test yourself? guess which one of us is due first. Oh and which one is ME?! Answer after the 'read more' link :-)

On a crafty note, the unicorn embroidery is still in progress. Taking a lot longer than I'd expected but it's a BIG piece of work so I'm kinda not surprised. I'm also partway through the dress version of my Maternity 'pirate' top. I've only got around 4 weeks left to go, but the great thing is that because it's elasticated I can wear it after Squiggle arrives, and 'cos it's button up it'll be good for breastfeeding. win win win win win.

Anyhow, guessed whose going to 'pop' first yet? Guessed which one is me?

Friday, June 10, 2011

Maternity 'Pirate' Top - Mens shirt upcycle - Tutorial


OK,  as promised a TUTORIAL for my men's shirt upcycle :-) I've made this as a maternity piece but it could of course suit the un-pregnant ladies out there who are best served by an empire line for whatever reason...

Sunday, June 05, 2011

TG: 33 Weeks!!


We're into countdown mode now, 33 weeks, 7 weeks left to go!

This is a top I made myself out of a men's shirt. It was intended to just give me something to wear to a pirate theme party I went to last weekend, but it's turned out to be the most comfortable top EVER.

I'm on maternity leave from work now and I'd been squeezing myself into an array of maternity and non-maternity wear since I was determined not to buy anything new for the last couple of weeks. Being able to dress casually full time now (and even just in my PJs if I like) is SUCH a relief!

Anyhow... I took lots of pictures, so a tutorial for making a top like this will be coming up this week. It took no time at all!! and I've even gone out and bought a couple more shirts (from charity shops - of course!) so I can make some more and perhaps make a dress modification (did I mention it's the most comfortable thing ever?)

EDIT: Tutorial is UP!! - HERE

My baby related thoughts are:
I'm thinking about...  going for a water birth, the hospital I'm going to is well equipped for water births (I believe) and I'll talk to my midwife about it when I see her next.
The Husb0t has begun... clearing out 'his' StarWars room so it can start receiving baby related furniture.
I have... a gym ball! so I can sit on it to encourage my Squiggle to get in the correct position for birth - if the Husb0t will ever get off the damn thing!
I'm frustrated... that there doesn't seem to be anything going on in the NCT Branch where I live. I'm going to invite some of my antenatal class ladies round to sew some breastfeeding pillows and stuff... if they want.. I'll be doing it anyway so it's a good way of them getting something for nothing (and a good way for me to reduce my stash!)

Monday, May 02, 2011

PM: Whole Lotta Baby Dress - Tutorial


Lets have another look at that dress:


not pregnant? don't panic! you can still make this dress and be (almost) as awesome as us pregnant ladies!

Whole Lotta Baby Upcycled T-shirt dress TUTORIAL

You will need:
  • 2 Large Mens T-shirts
  • some scrap stretch jersey fabric (or another T-shirt)
  • A T shirt/vest that fits you comfortably (Template t-shirt - with similar stretch properties to your donor T shirts)
  • A sewing machine (or even better - a Serger!)
  • Stretch fabric needles
  • Dressmaker’s chalk
  • Suitable scissors
  • Pins
Measurements:
Put on your template T shirt and draw a line where your bump begins (or your empire line - under bust - this is where your skirt will flare out from) and where your bump ends (or your hips - where your body is widest when you are not pregnant! this is where your skirt will be attached.) decide how long you want your skirt to be

Notes on Sewing Stretch Fabrics.
a) for best results use needles specifically designed for knit or stretch fabrics, ballpoint needles will work, needles which are specifically labelled for jersey fabric, or labelled ‘stretch’ are good. Regular needles will punch through the fibres of the fabric, possibly causing bigger holes or ripping/weakening of the fabric.

b) 99% of the people following this tutorial probably don’t have a serger.... that’s sad because sergers LOVE t-shirt fabric! if you’re using a regular sewing machine you should use a zig-zag stitch (here’s a video that might help) Zig zag stitch stretches, straight stitch doesn’t.

Steps:
1) using your template T-shirt, trace around the T-shirt that will form the top of your dress, down to the 'top bump line’
2) from the 'top bump line’ carry on the line straight down to form a square edge against the bottom bump line.
3) add seam allowances (I didn’t have enough spare fabric for regular seam allowances so I just sewed along the construction lines)
4) take your 2nd t-shirt (which you’re going to make your skirt out of) and pin together front and back of the T-shirt.  Draw a rectangle the width of the bottom of the top piece, and the length of the desired drop of the skirt (from bottom bump line), plus seam and hem allowance.


Are you pregnant? - make the maternity dress by following step 5a .... not pregnant? make a regular dress by following step 5b
5a) create a curve at the bottom of your rectangle, this will form your front hem shape and stop your skirt from rising up as your bump grows. My curve extends the front middle hem by about 2.5/3 inches. Cut this shape (which should give you 2 if you’ve got front and back pinned together) - flip the whole thing over and trim the back skirt piece so that hem shape there is straighter. You can check and tweak this later so don’t worry too much about straight hems at this points.
5b) Cut your rectangle shape (which should give you 2 if you’ve got front and back pinned together) this should give you your front and back skirt pieces. You can check and tweak the hemline later so don’t worry too much about straight hems at this points.
6) sew together your top t-shirt and the rectangle skirt pieces (right sides facing!!) at under bump line (or hip line)

 IF YOUR WORK LOOKS LIKE THIS YOU'RE DOING IT WRONG!! - step back form your work, sit in the corner and chant 'right sides facing'for 5 minutes.... 

7) draft your ‘wedge’ you need a wedge of fabric to help form your dress... mine is red. it needs to be the length of your empire line/over bust line->the bottom of your hem, but other than that it’s up to you how far you make your dress to flare out at the bottom. Don’t forget to add seam/hem allowances. It also makes it easier if the top of your wedge is clipped a little so you can see where your hem allowance ends.
8)sew in first side of wedge (remember right side facing!)
9) match up your side seams right from the armpit down to the bottom hem, pin it all together paying special attention to where the wedges begin and the skirt flares out.
10) sew side seams right sides facing. Turn right side out, try on give yourself a little clap, check hems/fit etc and tweak as necessary.
Finishing
I’ve got a serger, so I just whipped out my 3 stitch serging stitch and ran across the bottom hem, I also finished the neckline and sleeves with bias tape.
Alternatives - you can hem the bottom hem or leave it raw (t-shirt fabric doesn’t fray), you can also use this technique for finishing the edges with scraps of fabric you may have cut off the T-shirts in the process of making the dress.


Saturday, April 30, 2011

PM: Whole Lotta Baby Dress


So I made a dress, I made it out of 2 T-shirts and some scrap red fabric... it looks like this:


And in err... more normal light... 

of course... tutorial... coming soon

Wednesday, April 13, 2011

PM: Jersey Dress COMPLETED


I've been quiet on the Project Maternity front for too long, in the words of Blink 182: "Work Sucks, I know"

What doesn't suck is this dress:
I'm not that keen on the colour, the green is a lot duller than I'd first intended. The pattern I butchered was from Burda Style magazine, it's not been published on this website yet, when it is I'll post a link.

As you can see I completely changed the pattern around, I got rid of that collar because I don't have time to learn how to do collars... I'm GROWING!! I also modified the sleeves, to make them the more summer-friendly tent sleeve shape.

How I did it:
  • I traced the pattern pieces from the Burda Style Pattern Sheet.
  • I used this great technique on burdastyle on how to create a Tent Sleeve (thankyou BurdaStyle member sunnie for contributing this technique)
  • I modified the front pattern piece by performing a full tummy adjustment, with the effect of lengthening the front hem
  • I cut the fabric, but as I said I was omitting the collar so I just cut the front piece on the fold and rounded off the neckline at this stage.
  • I redrew the neckline on the fabric and after checking it was symmetrical and giving myself a seam allowance for the ruffle, I cut the new neckline.
  • I drafted my pattern for my ruffle. Ruffles can be made lots of different ways A separate tutorial for how I did this collar ruffle is coming soon!
  • I serged the edges of the sleeves and the ruffle using a 3 thread setting so that the weight of a hem wouldn't ruin the drape.
  • I constructed the garment with my serger, on a 4 thread setting, in this order:
    (1) attach front piece to back piece at shoulder seams
    (2) sew on sleeves.
    (3) sew sides together with seams that run from end of sleeve to bottom hem.
    (4) attach ruffle collar as you would a facing - right side of ruffle facing wrong side of dress - use regular sewing machine on zig-zag setting.
    (5) finish hem by turning over twice, pressing and zig-zag stitching.
In retrospect, I think this dress is probably still too big. I think the pattern I cut was too big in the first place, but actually that's completely welcome in the heatwave we're having in the UK, and my classroom is so hot too!! Not to mention the fact that I am growing! I love the sleeves, I think some kind of interfacing around the collar would be a good idea as it feels a bit shapeless. I think the hem should be shorter... but then what is the appropriate hem length for a pregnant lady?

I wish I was better at modelling... 

Sunday, March 06, 2011

Project Maternity - full tummy adjustment (dress)

First thing's first. I did not invent this technique. This is a version of the tutorial I found at Rostitchery which I'd seen successfully used on Polka Dot Overload. What I've learned in the last 3 months is that there's an absolute black hole when it comes to maternity alterations, so this is me doing my bit, linking to and walking through my full tummy adjustment (FTA)

This is the pattern I'm using:
It's from Burda Style Magazine's January 2011 issue. A Simple Jersey shirt-dress. I'm only modifying the front piece which looks like this:
as you can see above I've seperated the pattern piece into 3 sections, so I can follow Rowena's instructions...

You can also see in the picture above, I've extended the original centre front line by 3.5 inches.

The next step is to cut out the bottom left section:
see? I'm going to move it to the side by 3.5 inches too, but you want the side seam to run nice and smooth. you could do this by redrawing the line instead of cutting it, but to be honest, it's much easier ad more precise to just cut the thing up:
So all you have to do is pivot the cut piece so that the side seam runs smooth with the rest of the pattern, then you need to draw in your new bottom hem line, a nice smooth curve. This  curve is what's going to stop your skirt from getting a bit err... short as your bump grows. as Rowena points out:
"NOTE:  the hemline has to come out from the center front being completely horizontal or you'll end up with a pointy front.  once you get the horizontal established, you just make a curve that is pleasing to the eye"
 then tape the sucker down, add your seam and hem allowances and your done!... well.... you're done with the pattern alteration... you've still got to sew the thing.....
Easy huh?? like stupidly easy.... anyhow... lets see how it works in practice....

I also modified a skirt pattern, which was slightly different, that one was my idea so I hope it works! Tell you about it tomorrow!

Thursday, February 24, 2011

Project Maternity has BEGUN!

Basically in the last couple of days I've decided enough is enough! I've been avoiding sewing clothes for the past 3 months because of my pregnancy. I've been treating maternity wear as this sort-of mystical magical thing and it's not! Just like sewing any garments it's about research, planning and thinking through the problems logically.

SO.... I'm making my own spring/summer wardrobe... I don't know yet how many garments this wardrobe will consist but I'm going for it... and I shall call it:

STAGE ONE! RESEARCH!!
I'm not looking at the bump-alteration business at the moment, I'm looking for patterns/styles that will (or can with slight modification) accommodate some belly... so that's things made out of jersey/stretch materials, wrap arounds, empire lines.
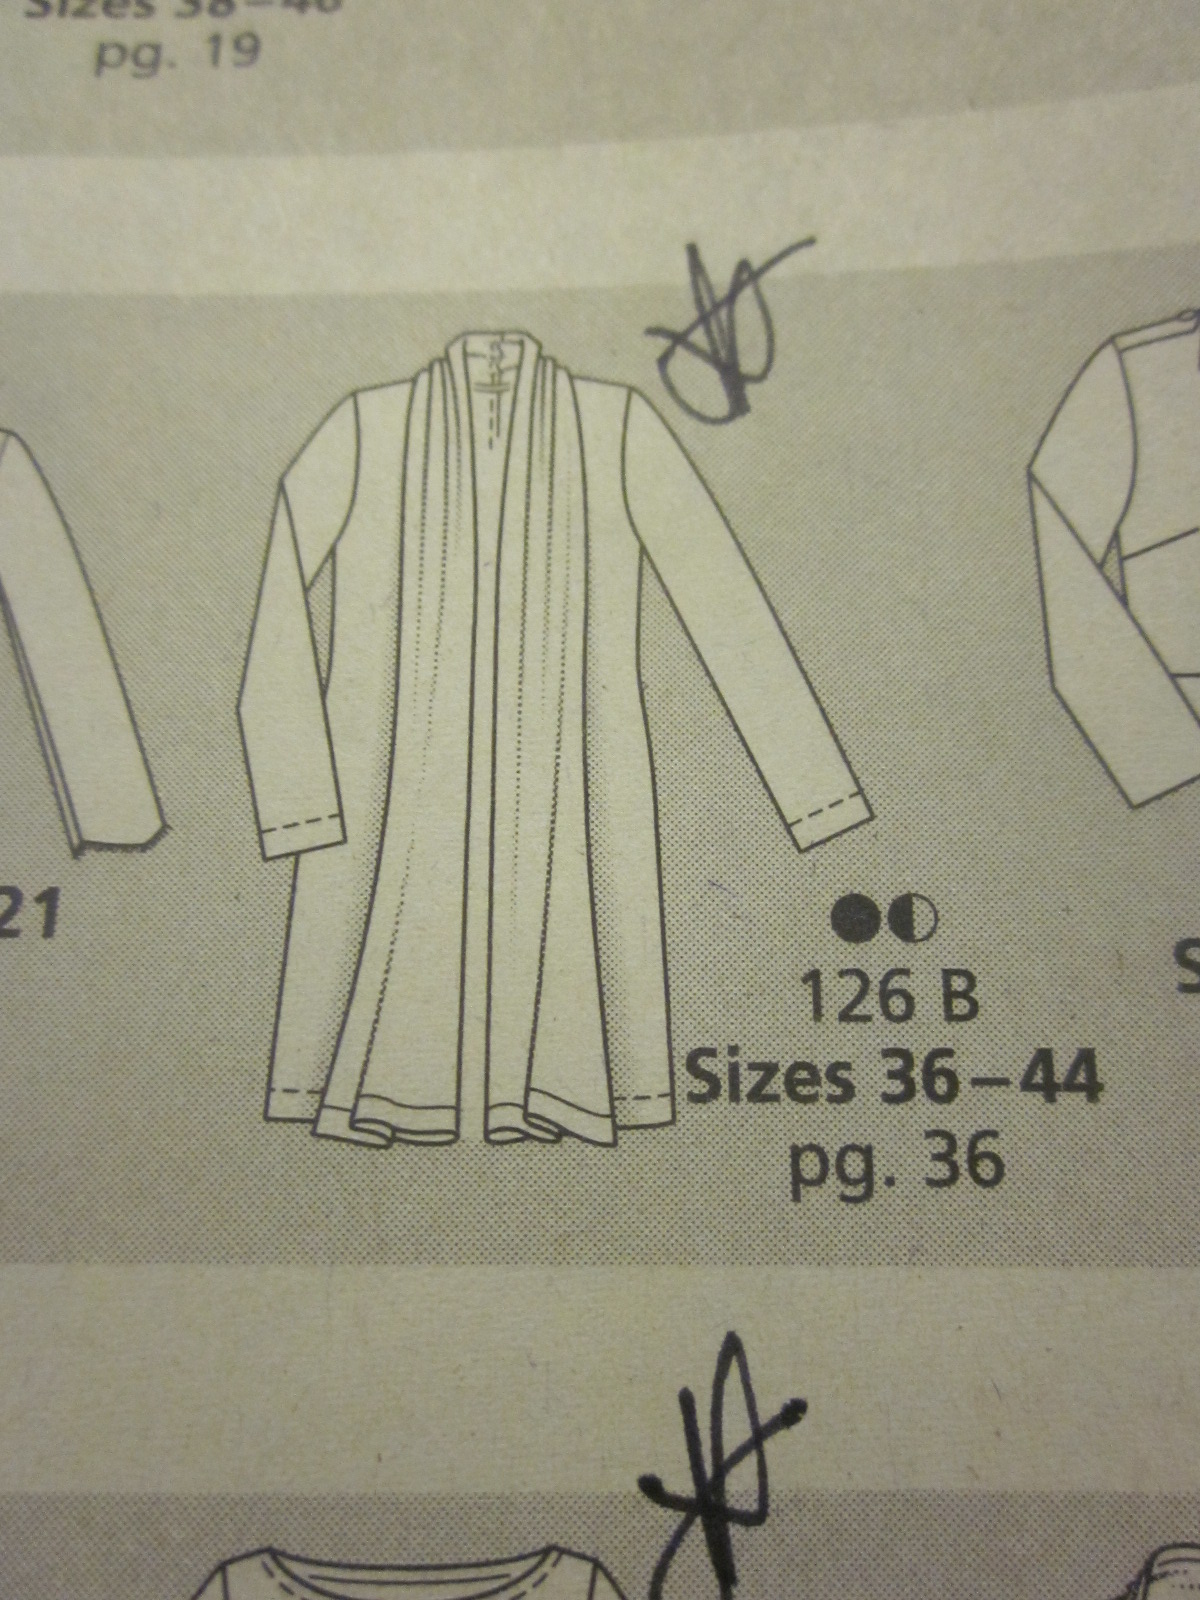
so first... from Burda Styles January issue.


 and from burdastyle's March issue:


 This Kaftan dress is particularly Maternalicious, check it out:

now... haahah I'm not EVER going to wear ANYTHING white... but look at that waist! ... tie back... expands until forever... this is the key to maternity sewing I think :-)


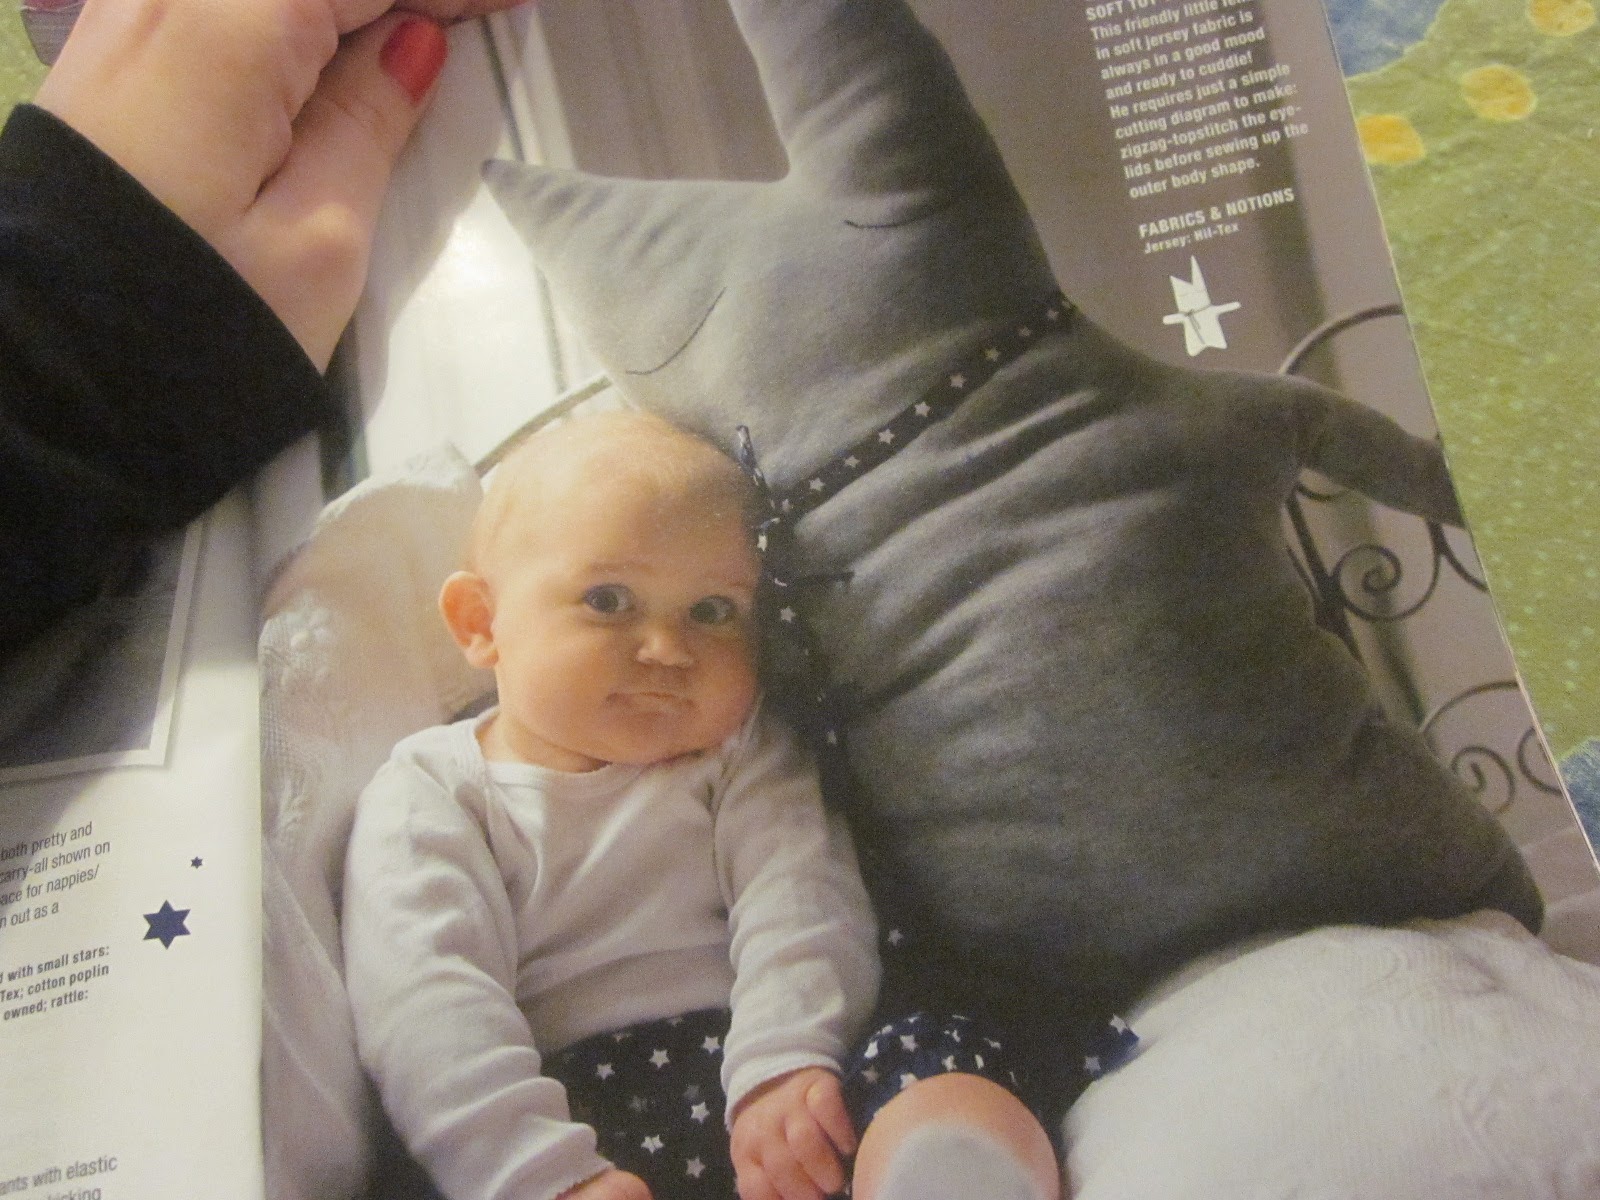
 In this issue they've even got things to make for babies, how perfect!


The next stage is... err editing! I seem to have found LOADS of patterns that will either work more-or-less how they are or with some alternation, I need to decide what garments are going to make it to the final line-up... how many garments I need... and then look at the fabrics out there and decide a colour scheme....

Am I brave or mad?