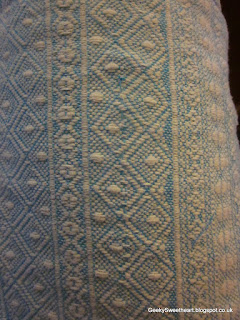
A woven wrap is a long length of material with a loose weave, this enables the fabric to keep it's strength and shape while having a good amount of 'give' along the bias (diagonal). These qualities make the fabric ideal for carrying a baby, allowing mama and bubbah hours of comfortable walking/playing/shopping :-D
... sleeping...
The downside of this loose weave is that individual threads can become snagged on clothing, car doors, velcro... and be pulled out of the weave, causing a nasty little loop to form on the surface of the fabric. In the most extreme incidences these threads can snap ad become broken, or can even form a hole :-( A broken thread is, unfortunately a hole waiting to happen. Once a hole forms in fabric it's much more liable to a tear... so for many people a broken thread is the death if a wrap... because they can't trust a 'hole waiting to happen' to carry their baby... fair enough! ... but they can be fixed :-) fixed broken threads are not always pretty, but they are safe if done correctly :-)
Step 1
Identify both ends of the broken thread, in the left hand image you can see one tail of the broken thread, but the other end is still woven into the fabric, you need to use a needle or pin to unweave the other, hidden end of the broken thread so you've got both to work with.
Step 2
Thread a needle with the longest loose thread and reweave it into the fabric. With some wraps this is easier than others. With the wrap on the right I was able to mimic the weave of the fabric more or less exactly, but with the more complicated patterned weave of the indio to the left I had to just do my best...
 |
 |
| Step 3 |
 |
 |
Rethread your needle with the 2 tails and push the loose tails into the weave, like you did before. This time you might need to use the blunt end of the needle since you're probably running out of 'tail' so be careful!
 |
 |
Step 5
Trim and enjoy!
Once you've woven as much tail into the fabric as possible you can (CAREFULLY!) trim the raggedy end away! FIXED!! yeyeyyeeeyyy!!
 |


How do you tell if a thread is broken, or just frayed? On my silky Ellevil, it looks like some of it caught on velcro, and there aren't threads pulled out, just a tiny spot of fuzzyness here and there. I am not sure if it is going to lead to a broken thread or if there is anything I could or should do to those fuzzy spots now?
ReplyDeletegood question! My first suggestion is to ensure there aren't any broken threads there hold it up to the light, you should be able to see if there are any broken threads there...
ReplyDeleteif not, you're right in thinking it's probably weakened slightly (velcro is a bugger!) but there's nothing really you can do except for checking that area regularly to see if it gets worse ... of course if it's close to the end you can always get it chopped off.. but these things are never that simple are they? :-)
Great tutorial! Thanks so much! Do you have any advice on how to fix a broken thread that is near the rail? I'm having a hard time getting enough thread to tie the knot.
ReplyDelete@Becca
ReplyDeleteI suppose it depends exactly how bad it is... and how much thread you have and how close the the rail it is....
you could unweave the short (rail) thread a little more, and reweave the long thread so they meet... if you're still struggling getting enough thread you can (VERY CAREFULLY as the threads can snap further and leave you in a right pickle!) pull the threads, this will gather the fabric behind them and give you a little more to work with ... you need to then estimate where to tie your knot based on how much thread you've pulled out of the weave and then treat the tied off broken thread as a pull...
if your broken thread is literally 1 or 2 cm away from the rail you might consider unpicking the rail stitching... reweaving the longer thread into the wrap so that it goes beyond the rail hem stitching line, and then re-sewing the hem to 'trap' the thread.... if you see what I mean...
feel free to find me facebook.com/geekysweetheart for any more help I can offer :-)
I didn't think about unpicking the rail! Brilliant! Thanks so much! That sounds like the best option but I might take a pic of it and post it for you on facebook just to be sure :)
DeleteDo you have any advice for removing pilling from a woven wrap? I assume of course that you couldn't fix it in the same ways s pilling on clothing (razor blade), as you chance breaking threads doing this...
ReplyDeleteThanks :)
Help! I have a small loop on a diamond weave. Any thoughts on fixing that?
ReplyDelete