Pages

Saturday, January 22, 2011

Space Raiders Fused Plastic Tote

there are lots of tutorials for this technique, and I suggest you look at many different ones, and experiment before trying to make anything aesthetically pleasing. This can go all sorts of wrong, over ironed plastic is not good:
the monster on the right has a bad case of 'plastic pox' on his nose.... it didn't photograph well but its GLARINGLY ugly in real life... anyhow...

Here's a good tutorial from KittyKill, one of the craftster Goddesses


So, no excuses, don't be blaming me if you melt plastic to your iron or pass out from plastic burning fumes, you have been warned!!

The great thing about fused plastic is that once you've done all the ironing you can sew it very much like you would sew fabric, with no worries about fraying edges or grainlines. Just let the fun printed designs do the hard work for you, see exhibit A:


I could have used binbags to fuse to the underside of the plastic and hidden the carrier bags, but I like the 'recycled' look. Also when I'm explaining how it was made it's much easier if I show them the carrier bags on the inside.

My new favourite bag!

x G

Sunday, January 16, 2011

Sunday Squee!!

cross posted at teensygeek:

You can get this super cute baby onsie from HutchMe’s Etsy shop. In my household the little jedi jokes have already begun, Mr T half suggested that he would like to consider Luke as a name. I dont think I could deal with that.

But I have developed a good stock answer for questions about the baby’s gender.
“are you going to find out if it’s a girl or a boy?”
“nah, no point, wether it’s a girl or a boy it’s still going to be dressed up as yoda”

Saturday, January 15, 2011

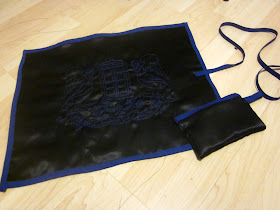
Dr Who Knitting Needle Roll (Dr Who Swap Round 4)

this is the Dr Who knitting needle holder I made for the Craftster Dr Who Swap (round 4) here's the other side:
all wrapped up:
and a close up of the embroidery detail on the hoop:
It was really simple, I kinda looked at this tutorial by lupinbunny, decided I wanted to use some tardis coloured binding strip instead of hemming everything and  I just sort of filled in the gaps.

Have some in-progress shots:
these are my materials, I ended up having to use 2 skeins of embroidery floss because it was such a big design (if I recall correctly I used 3 strands) - and that's HOMEMADE binding strip :-) hell yea!
The measurements here are 18" wide for everything, all those numbers are the height's in inches, the last 4 inch one is what I used for the little pouch in the first picture.
This is the pieces put together, as you can see I intended to use the 4" tall length as a final pocket but I decided it was redundant partway through the project.
 This is me transferring the embroidery design onto the black fabric using white carbon paper
 and there's the transferred design, ready for stitching! I did the whole thing in backstitch, using a 12" embroidery hoop mounted on the embroidery stand I was so lucky to find in the charity shop.


This is where I did a lot of the work :-)

I also sent my lovely partner this very tiny embroidery hoop:

(I just noticed the big 'ole CHINA mark on the bottom of the hoop... hmmm... should have put that to the back... *rollseyes* )

Anyhow, hopefully you've managed to follow what I did there... hope you like it!

x G

Wednesday, January 05, 2011

Christmas Secrets REVEALED!!

So, here's one thing I've been keeping from you, my adoring public:


This is an embroidery that I did for my mam for Christmas *waves at mam*. My mother knows the ways of the Internet so I couldn't show you for rear of ruining the surprise :-)
The pattern is from Tipnut's library of free downloadable embroidery patterns... seriously you should go on there! there's loads'a stuff! fair enough, the site is basically a collection of links to other sites, but it's a good set of links, and if you're looking for pincushion patterns, apron patterns or things to embroider on your tea towels (??) then this site is really useful.

Of course, the text was added by me... this is the original pattern:

So many more things to tell you! make sure you check back soon, make sure you 'like' my facebook page to get real time updates on my crafty adventures!

x G